When to replace your hard drives.

All hard drives will die. The question is not if, but when. This is why finding reliable hardware AND having a solid back up strategy is extremely important.

Finding Reliable Information.

Reading tech reports like Backblaze’s annual report on hard drives is important, because they provide priceless information on which brands and models NOT to buy. At the end of 2018 Backblaze was monitoring 104,954 hard drives used to store data, so they REALLY know which hard drives are good, and which ones should be avoided.

For example:

“Based on 1,220 drives and nearly 500,000 drive days, the AFR (Annualized Failure Rate) of the Seagate 10 TB drives continue to impress. For 2018 it was just 0.33%.”

When can you or I test a thousand hard drives, let alone a hundred thousand? Never, that’s when.

Last year alone, Backblaze had 180 Western Digital 3TB drives remaining, and ALL of them where removed and replaced with 12TB drives. Sometime this year they plan to replace all of their 4TB and 6TB drives and upgrade them to 14, 16, or even 20TB drives.

Annualized Hard Drive Failure Rates from January 2018 to December 2018.
Annualized Hard Drive Failure Rates comparing 2016, 2017 and 2018.
Annualized Hard Drive Failure Rates from 2013 to 2018.

Key Stats.

There are a LOT of useful gems we can extract from Backblaze’s 2018 report:

  • Backblaze replaced 3TB, 4TB, and even a handful of 6TB drives with new 12TB drives. The drives replaced are about 4 years old.
  • The failure rates of all of the larger drives (8, 10, and 12 TB) are very good: 1.21% AFR or less.
  • In September 2018 Backblazde added 79 12TB drives, and as of this publication, none of them have failed.
  • The Seagate 10TB drives, which have been in operation for over 1 year now, are performing very nicely with a failure rate of 0.48%.
  • In 2016 the average size of hard drives they had was 4.5 TB. By 2018 the average size had grown to 7.7 TB.
  • The 2018 annualized failure rate of 1.25% was the lowest by far of any year they’ve recorded.
  • The Seagate 10 TB drives continue to impress as their AFR for 2018 was just 0.33%. That’s based on 1,220 drives and nearly 500,000 drive days, making the AFR pretty solid.
  • None of their Toshiba 5 TB drives has failed since 2016.

Do you find this info useful? If so, leave your comments below.

MY VIDEO GEAR
Amazon

ONLINE COURSES
Lynda.com
Mini Tutorials
LinkedIn Learning

DISCLAIMER
This article is not paid or sponsored by anyone. It reflects my own independent opinion. I only recommend companies and products that I trust. Some links might be affiliates, which means I may get a few pennies if you decide to purchase something.
Thanks in advance for your support!

SOCIAL
YouTube: 1PersonCrew
Instagram: @1PersonCrew
[jetpack_subscription_form show_only_email_and_button=”true” custom_background_button_color=”undefined” custom_text_button_color=”undefined” submit_button_text=”Subscribe” submit_button_classes=”undefined” show_subscribers_total=”false” ]

Sound Effects libraries, from free to super awesome.

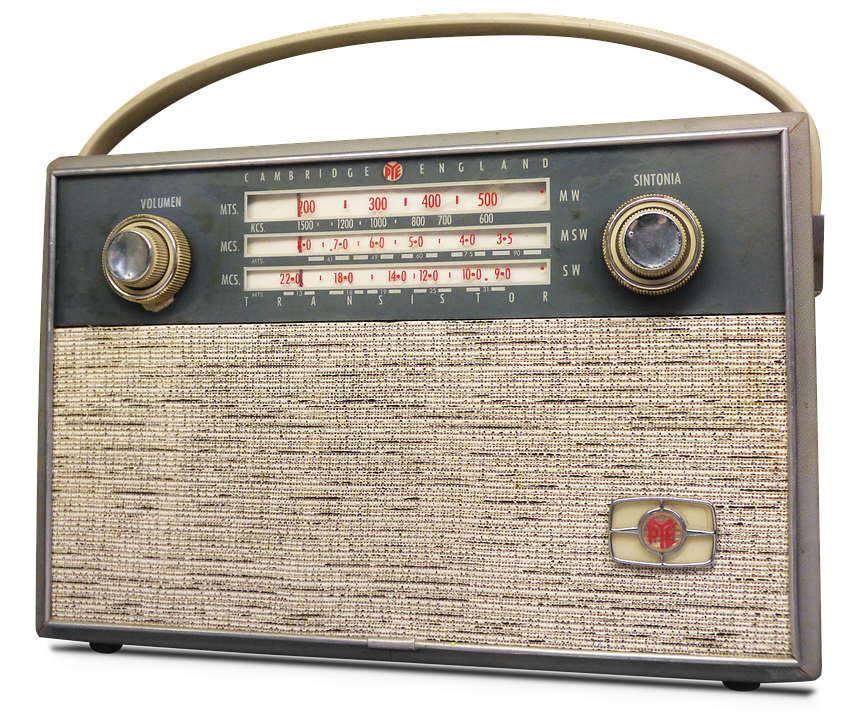
Image of an old radio

On any video production, regardless the crew size, sound design is key. We all know that. What’s is not very well known is where to find high quality and affordable sound effects.

Resources

On today’s video tutorial I share some of the websites I’ve found most useful, from the usual suspects, to the BBC and even a somewhat hidden sound effects library within YouTube.

Sound Effects library on YouTube

I quickly discuss when to spend time recording ambient sounds on locations and when I’ve found it’s better to rely on sound effects libraries. There’s even a tip on how to create sound beds for free and without any copyright issues, and lastly, I discuss why Artlist.io is currently my favorite music library.

By the way, if you like what you see at Artlist.io, this link gets you 2 months FREE.

Dive in. It’s just under 3-minutes long but full of (hopefully) useful info. If you have other resources I didn’t mention, please add them to the comments below.

The more we share, the more we learn.  

SOCIAL
YouTube: 1PersonCrew
Instagram: @1PersonCrew
ONLINE COURSES
Lynda.com
Mini Tutorials
LinkedIn Learning

Related Content

Being unfaithful (and testing new mics).

Why the Three-Act Structure is Obsolete.

Marketing is the fourth production stage.

Why I like cutting a trailer RIGHT AWAY.

Demystifying Recording Options on the Panasonic GH5.


When working as a 1 Person Crew we have plenty of things to worry about. Here are some underused tricks I use to save lots of time and minimize potentially fatal mistakes.

First, let’s face it. I’m a geek. I am one of the very few people who not only READ instruction manuals, but actually ENJOY doing so. Done. My public confession is out.

I have used way too many cameras (just ask my accountant, my wife or simply check the screenshot below). My current favorites for documentary work and short films are the Sony FS7 and Canon C200 (respectively) 

I also have been using the Panasonic Lumix line since the GH3, not only for their small form factor, portability, and image quality, but also because of their incredible versatility. You could adapt a Panasonic Lumix GH4 or GH5 to virtually any existing workflow, be it AVCHD, MP4, MOV, HD, 4K or Cinema 4K. That’s incredible!

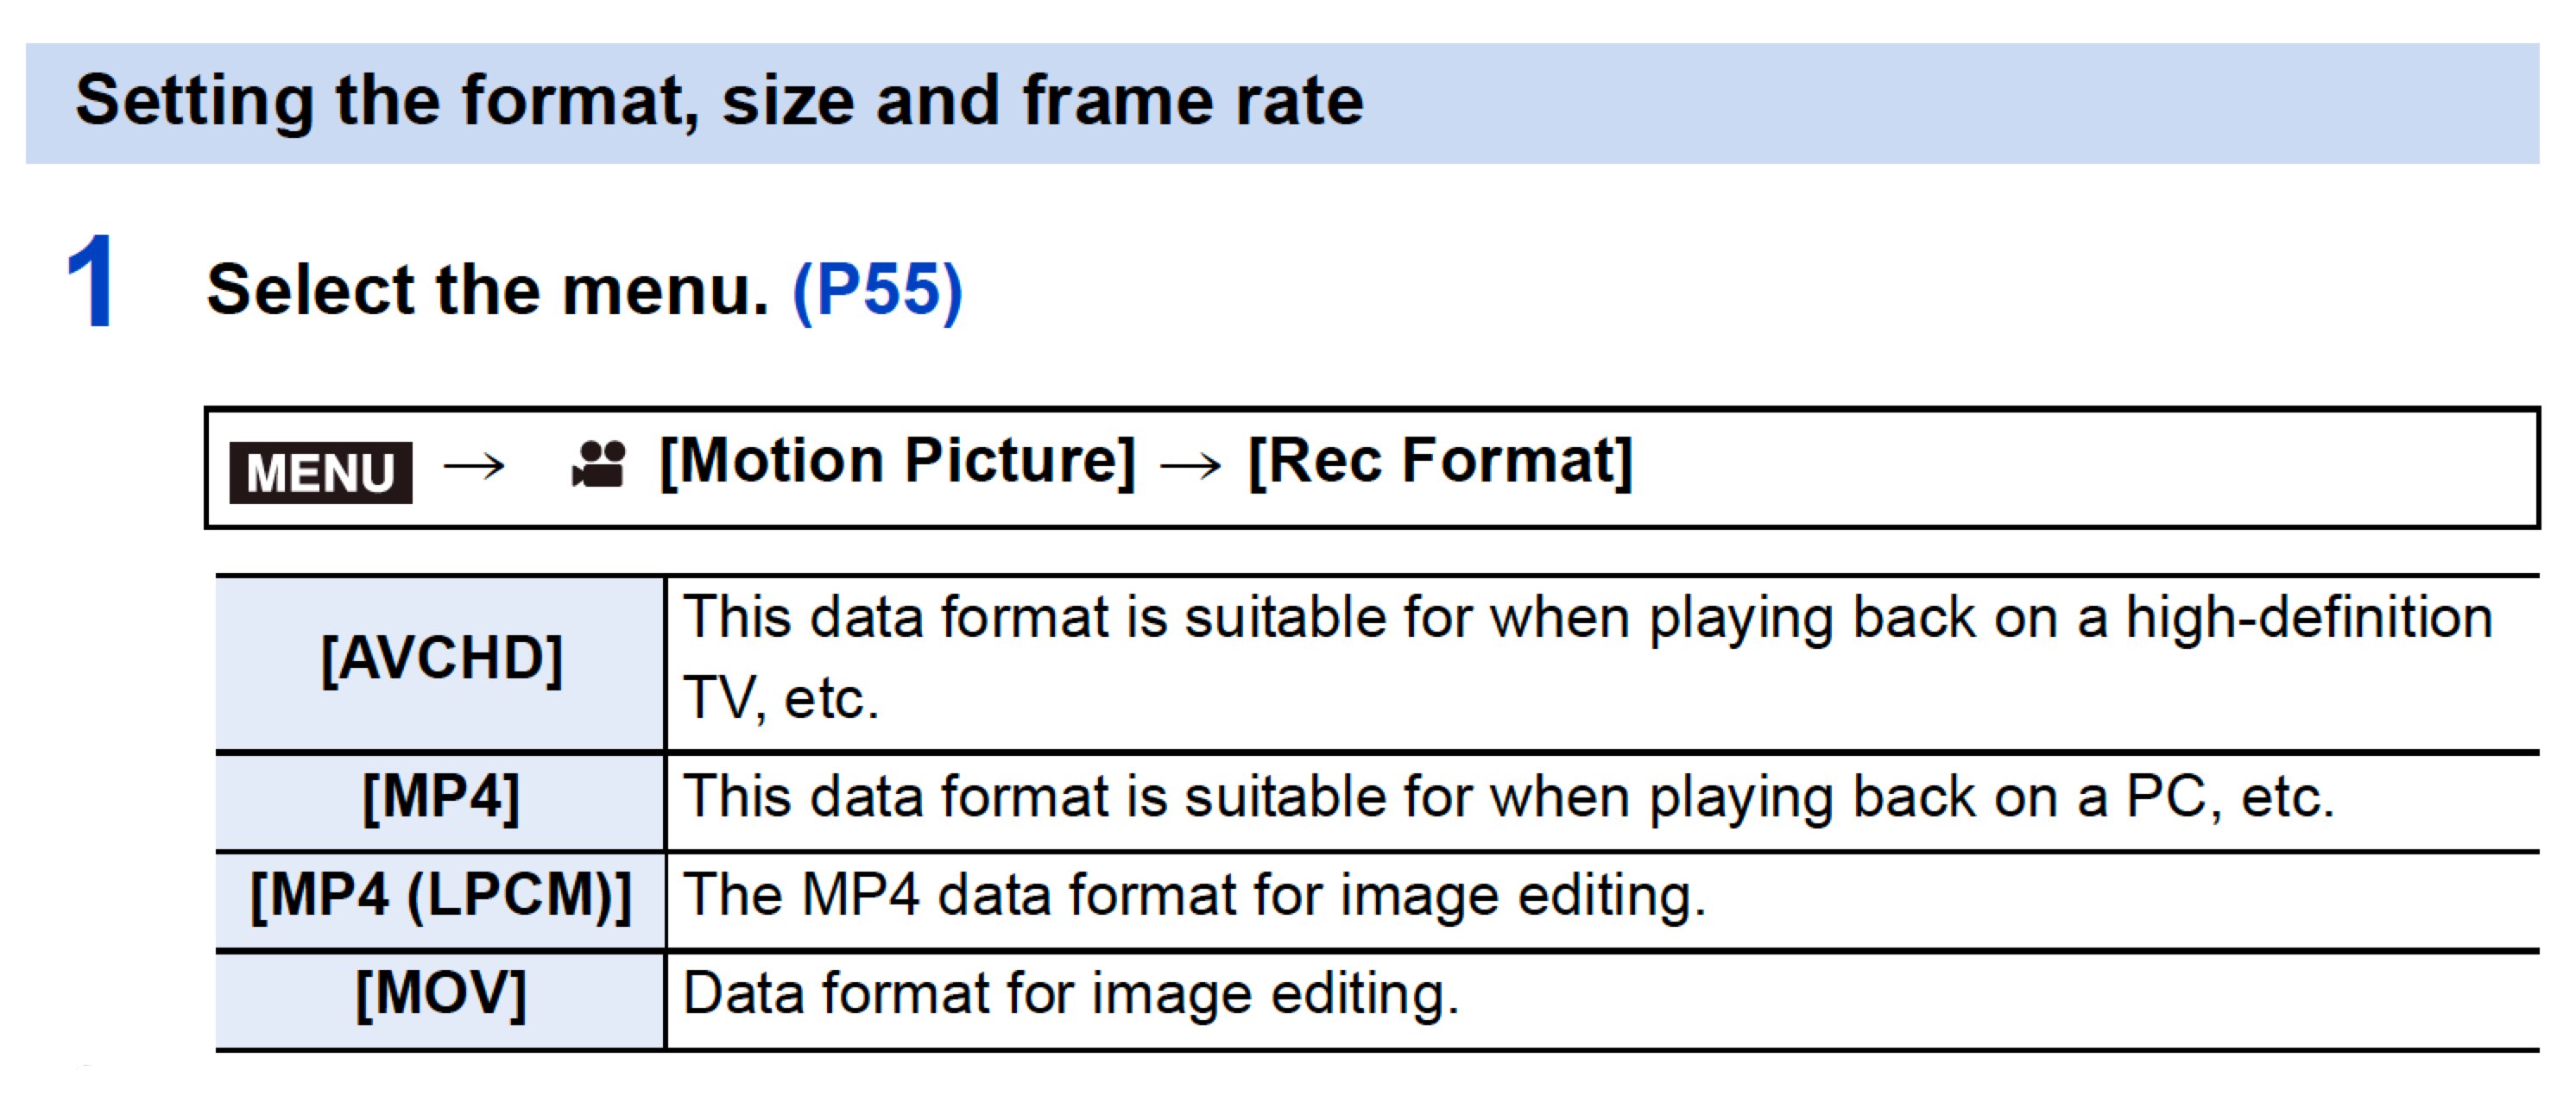
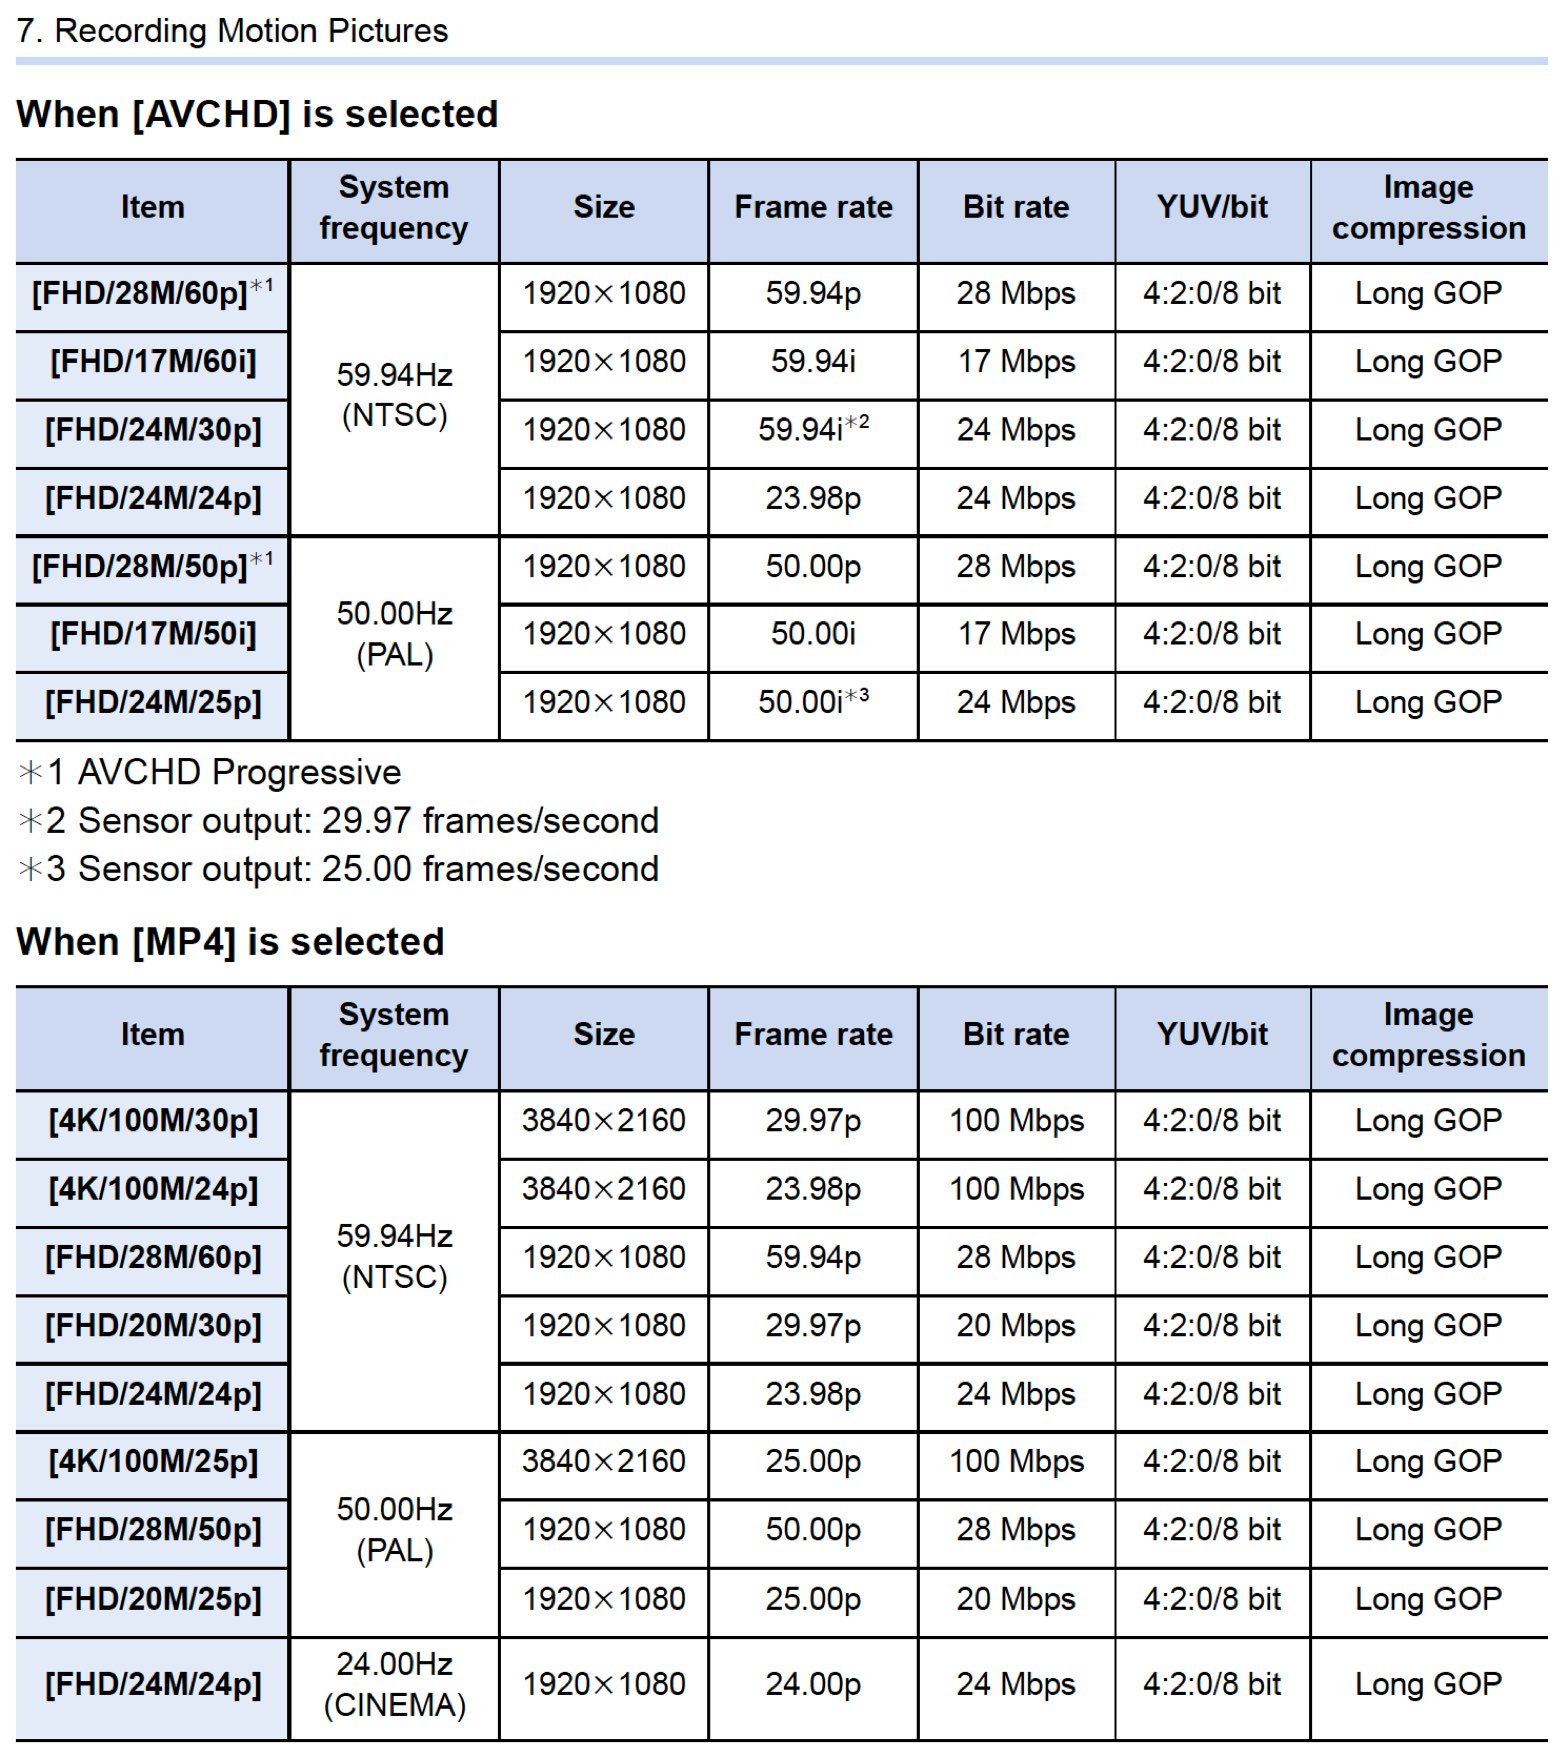
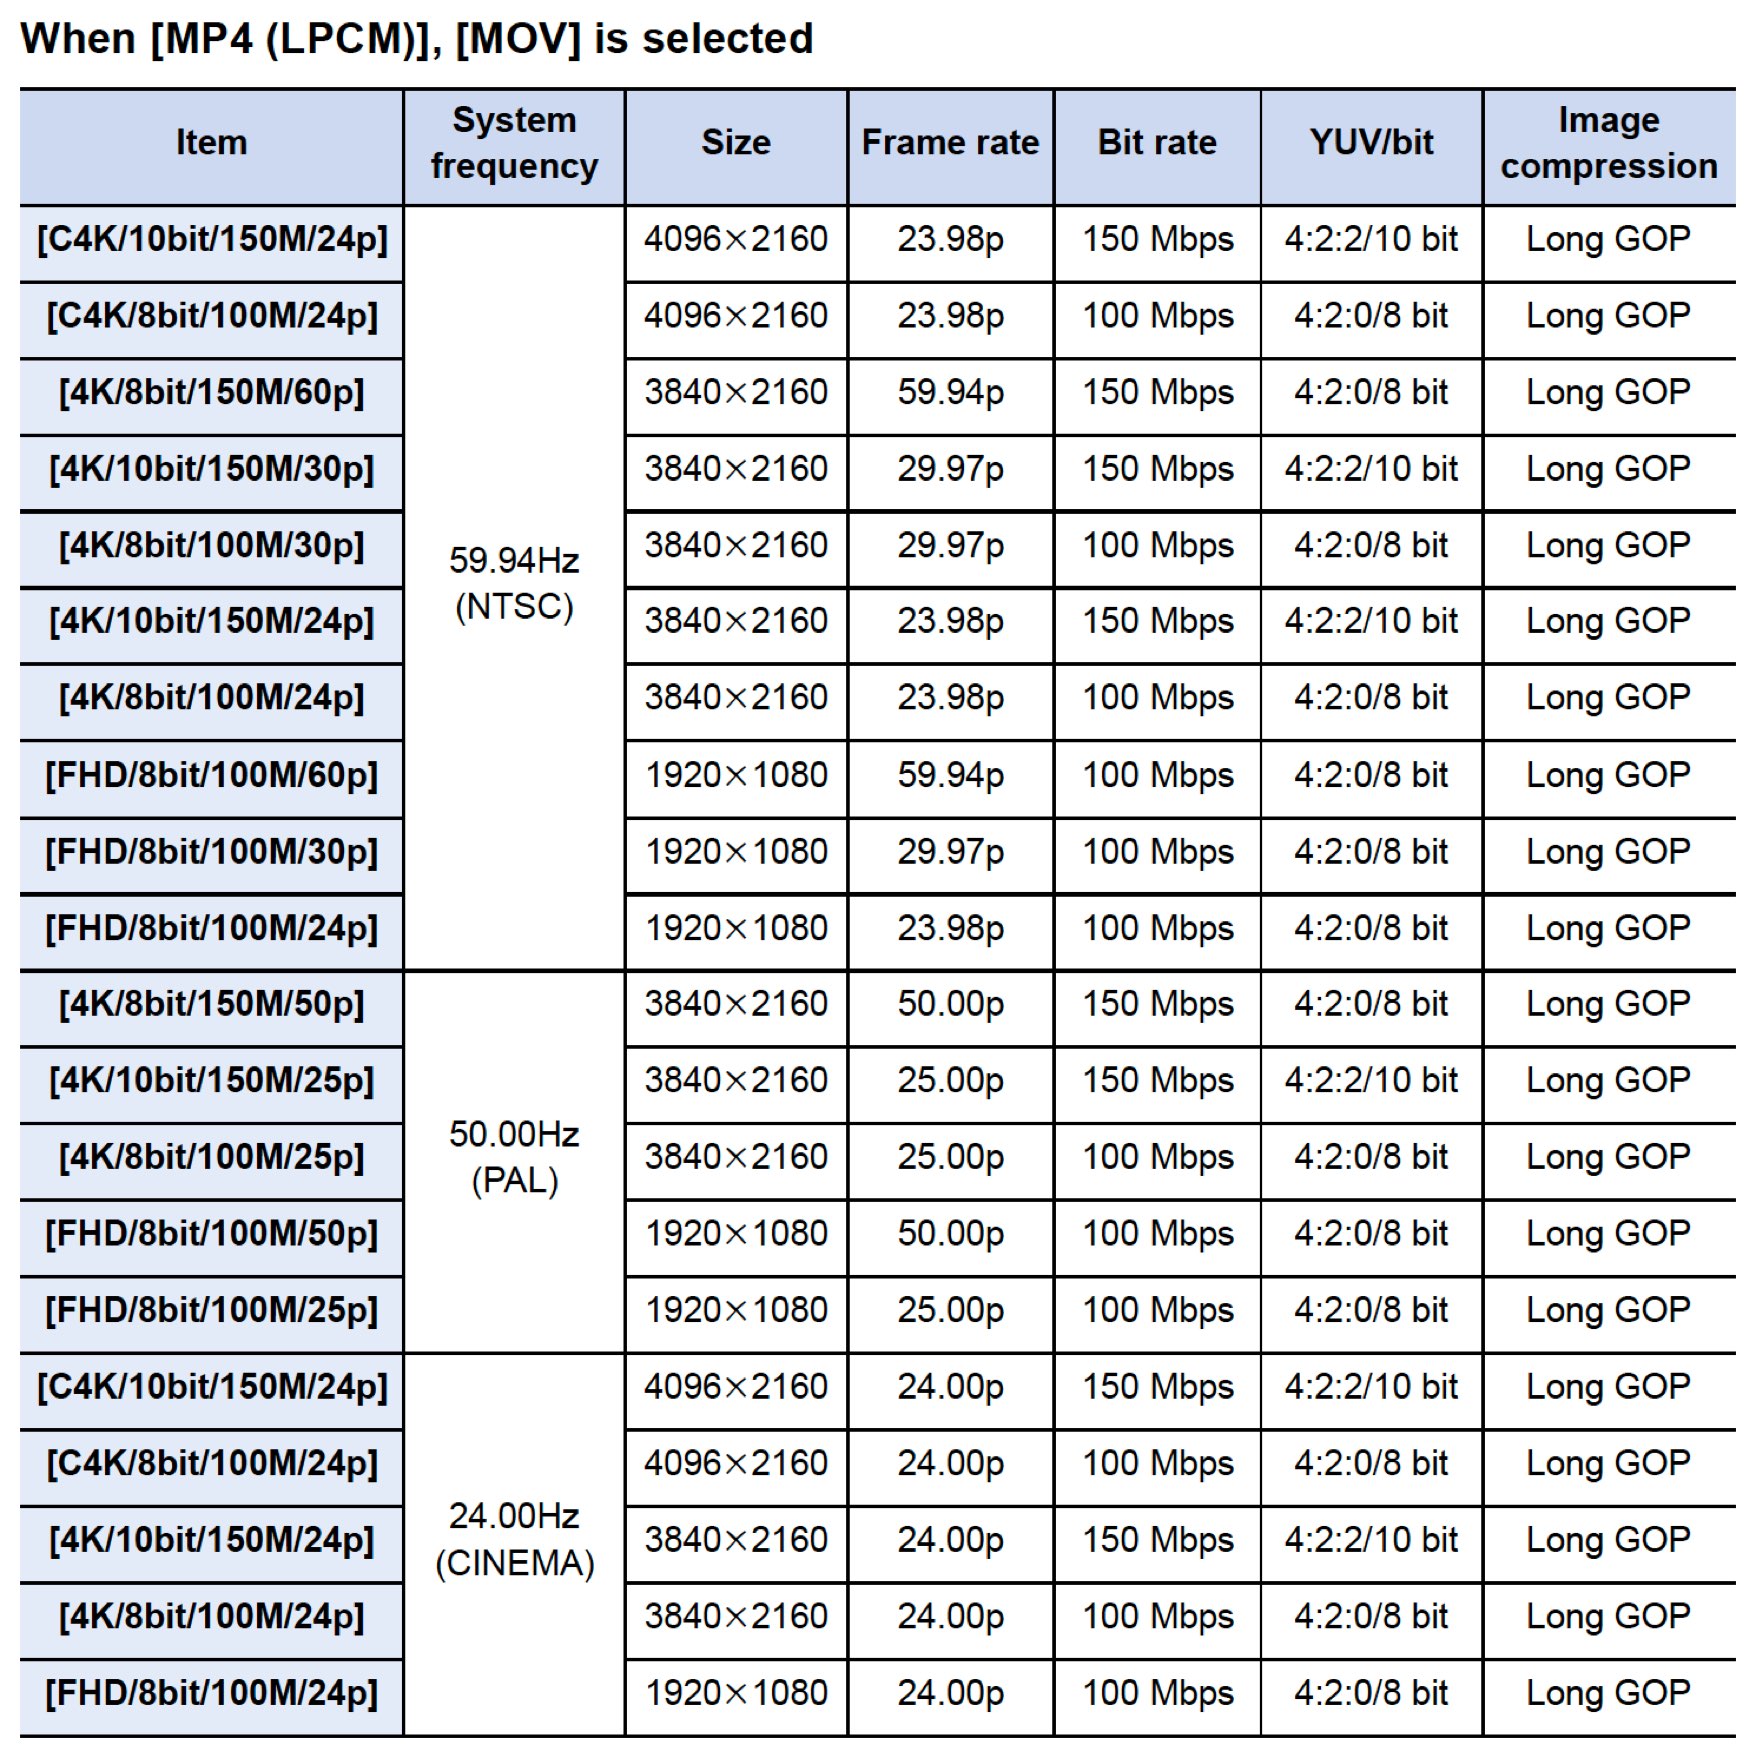
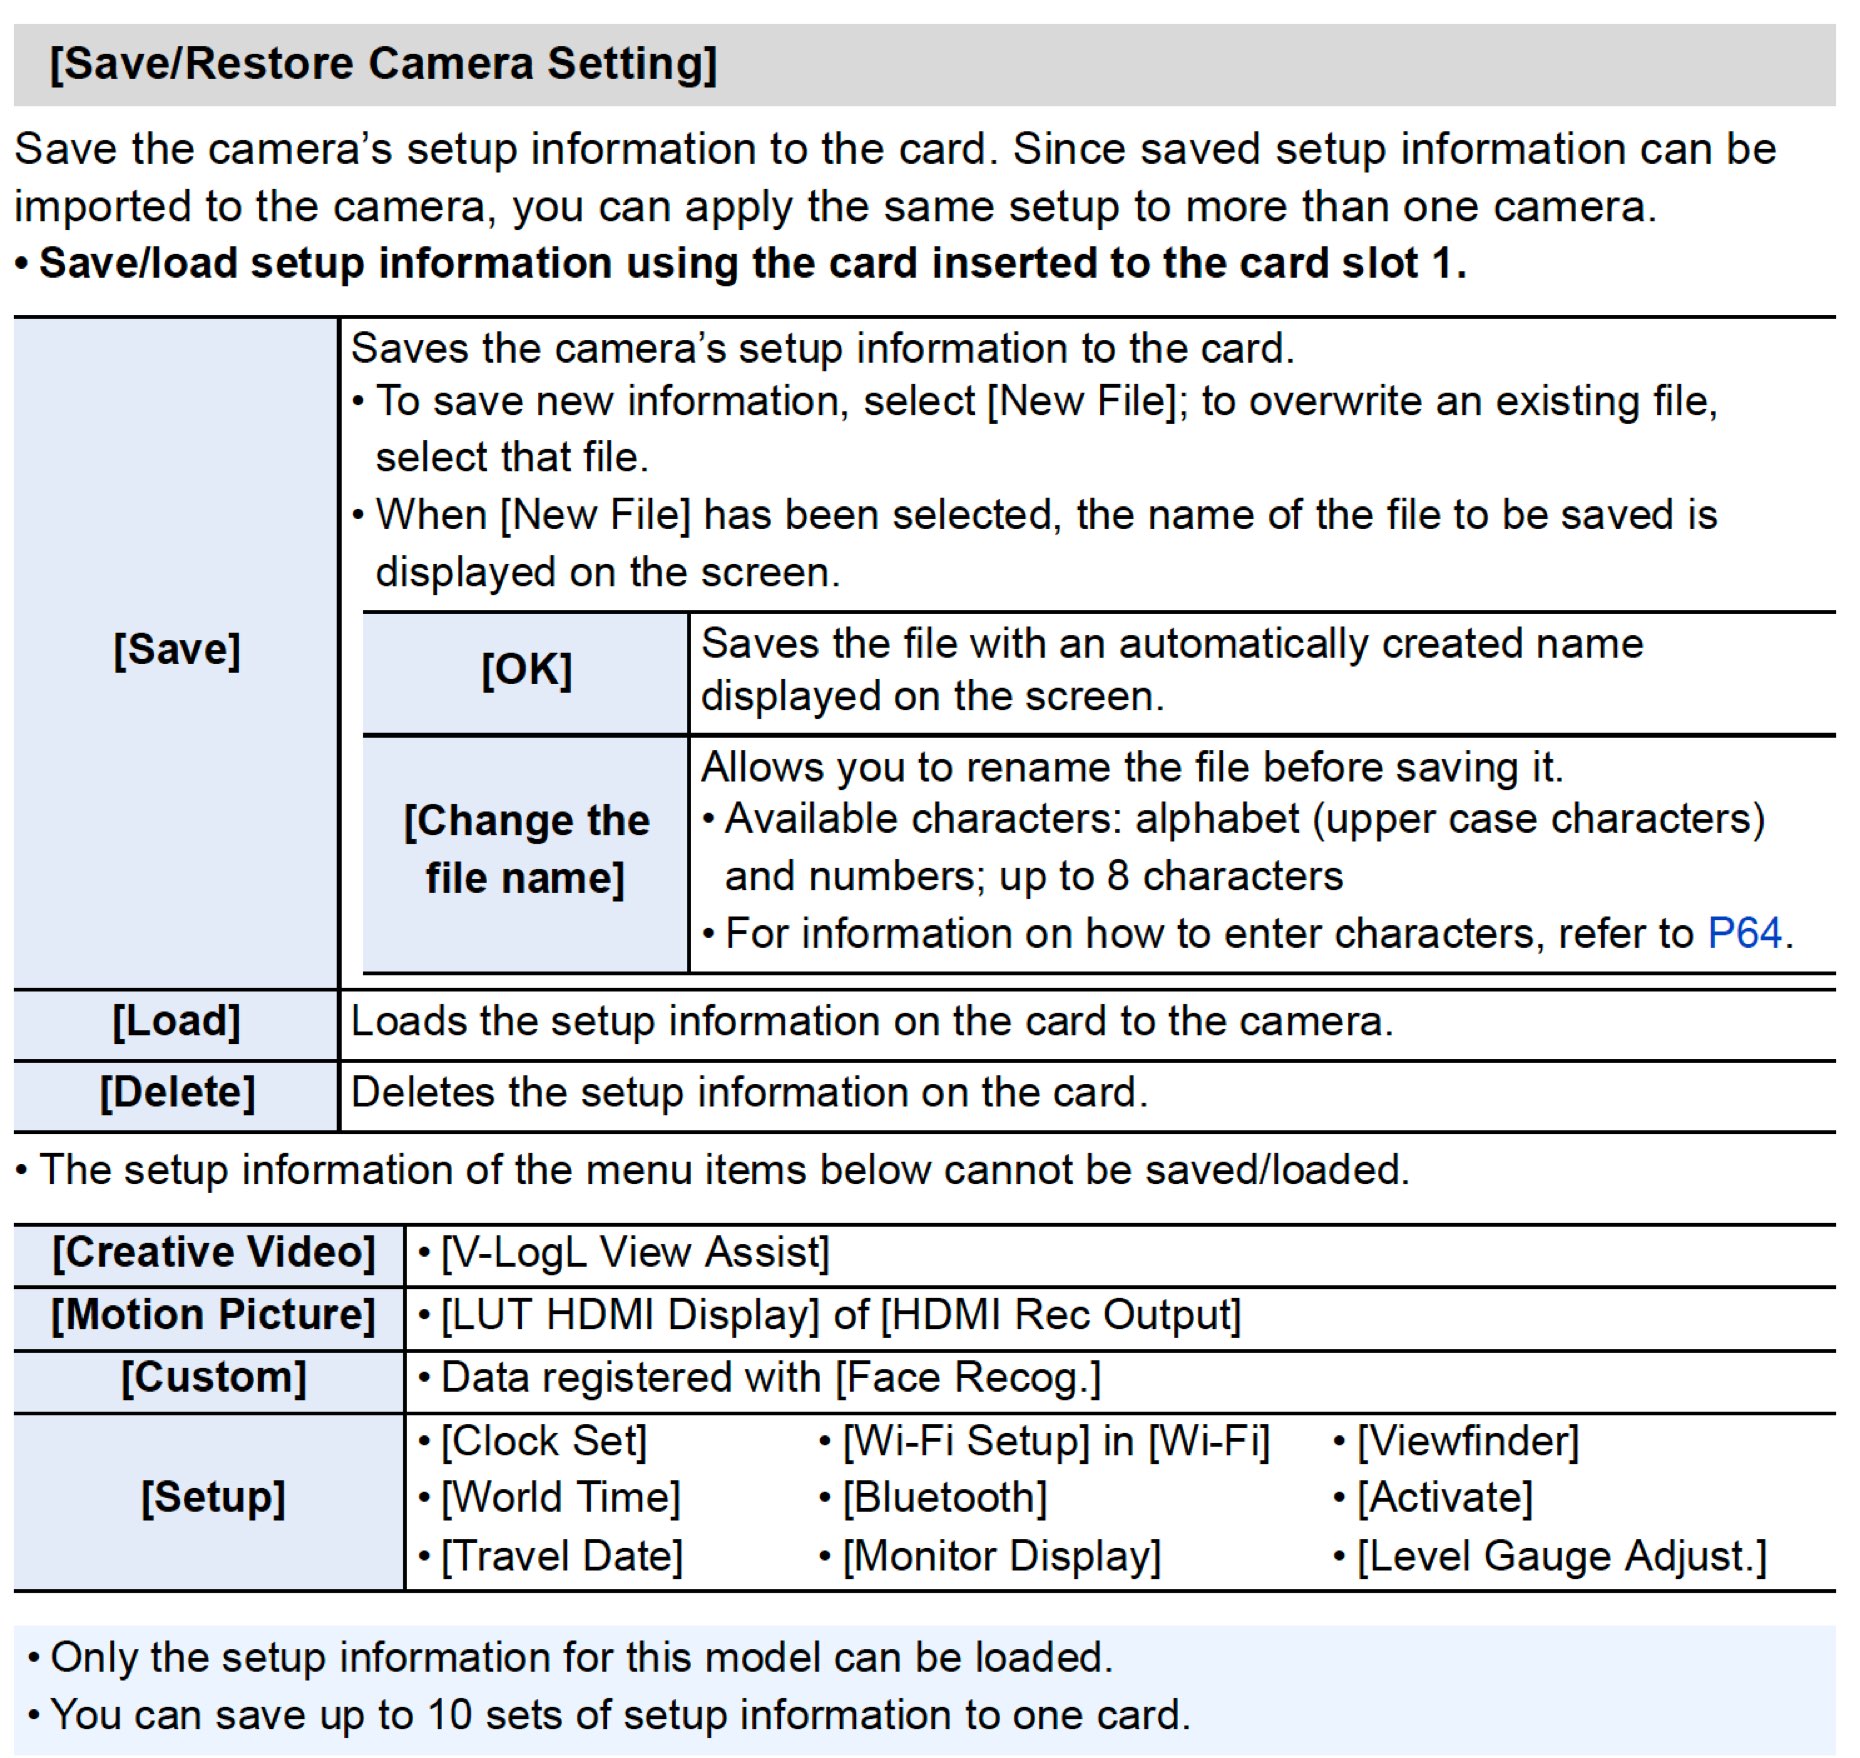
Screenshot from the Panasonic GH5 Manual.

Recording Options on the Panasonic GH5.

Today’s article is about choosing the right settings for a specific project. I usually bring at least two cameras on every assignment. I like to save identical settings on them, so when I turn the cameras on, they match exactly, every time. This saves a tremendous amount of time and minimizes potential mistakes.

Here are more screenshots from the Panasonic GH5 Manual, which seems perfectly designed to scare people away. The charts do not reflect the most recent firmware version (v2.3) for the Panasonic GH5.

My Ultra Geeky Approach

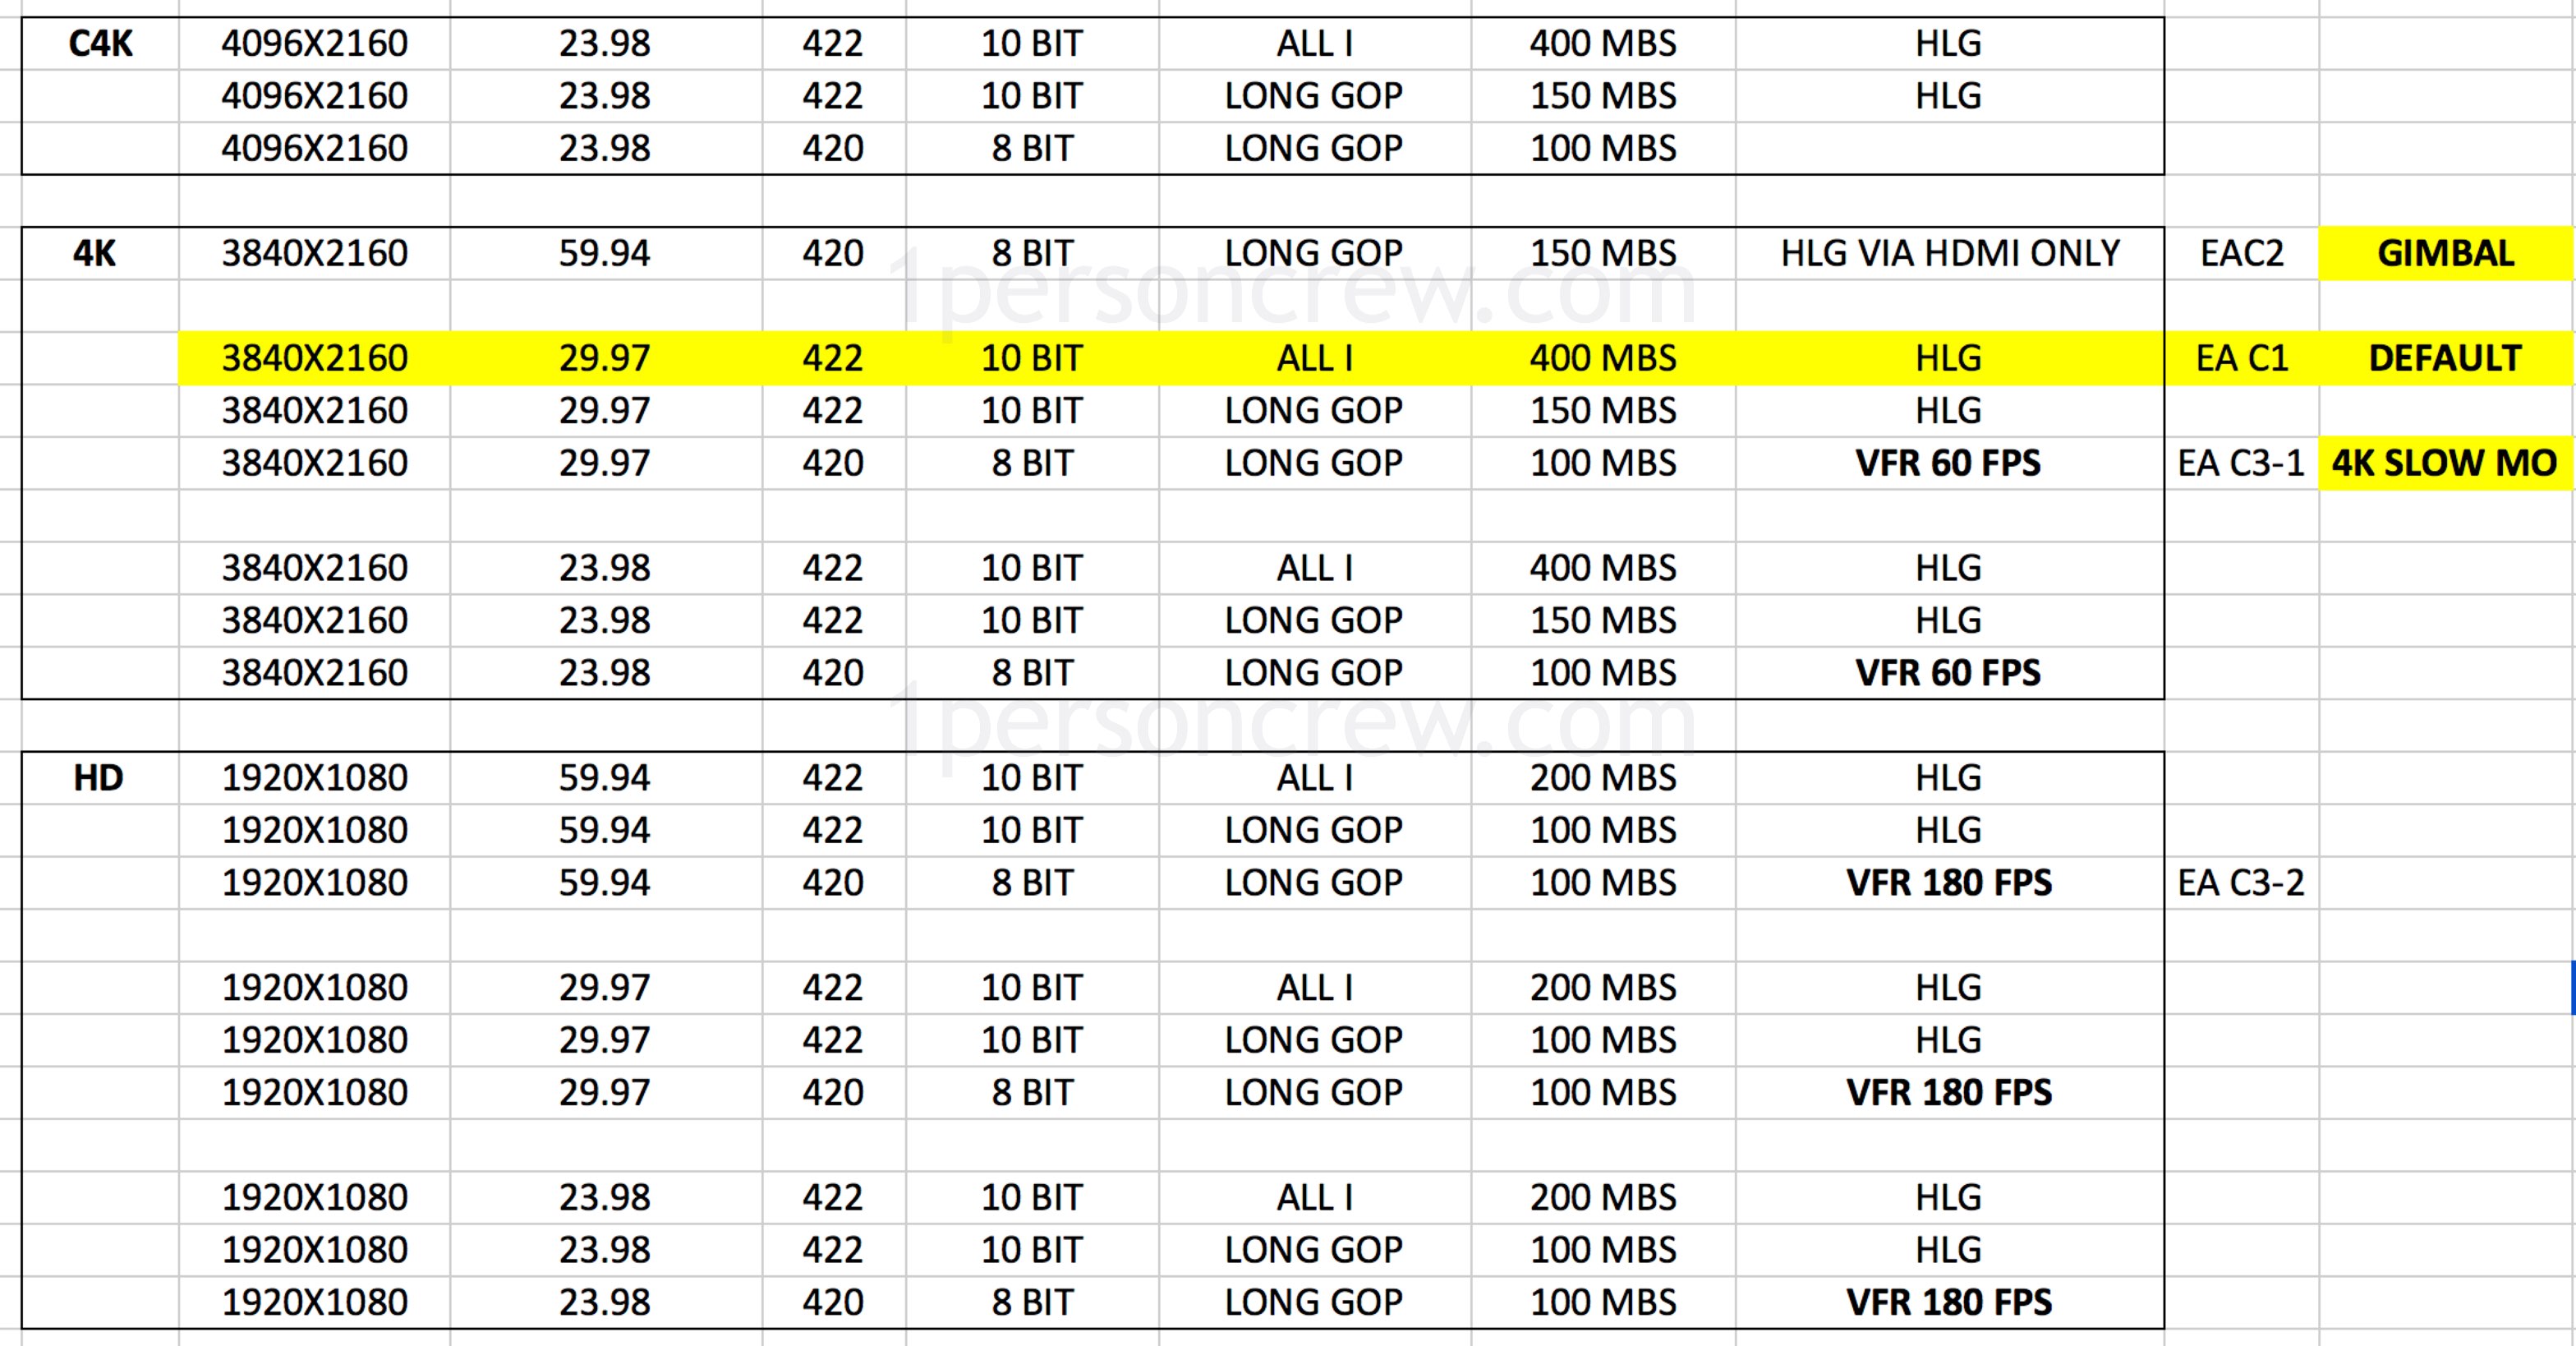
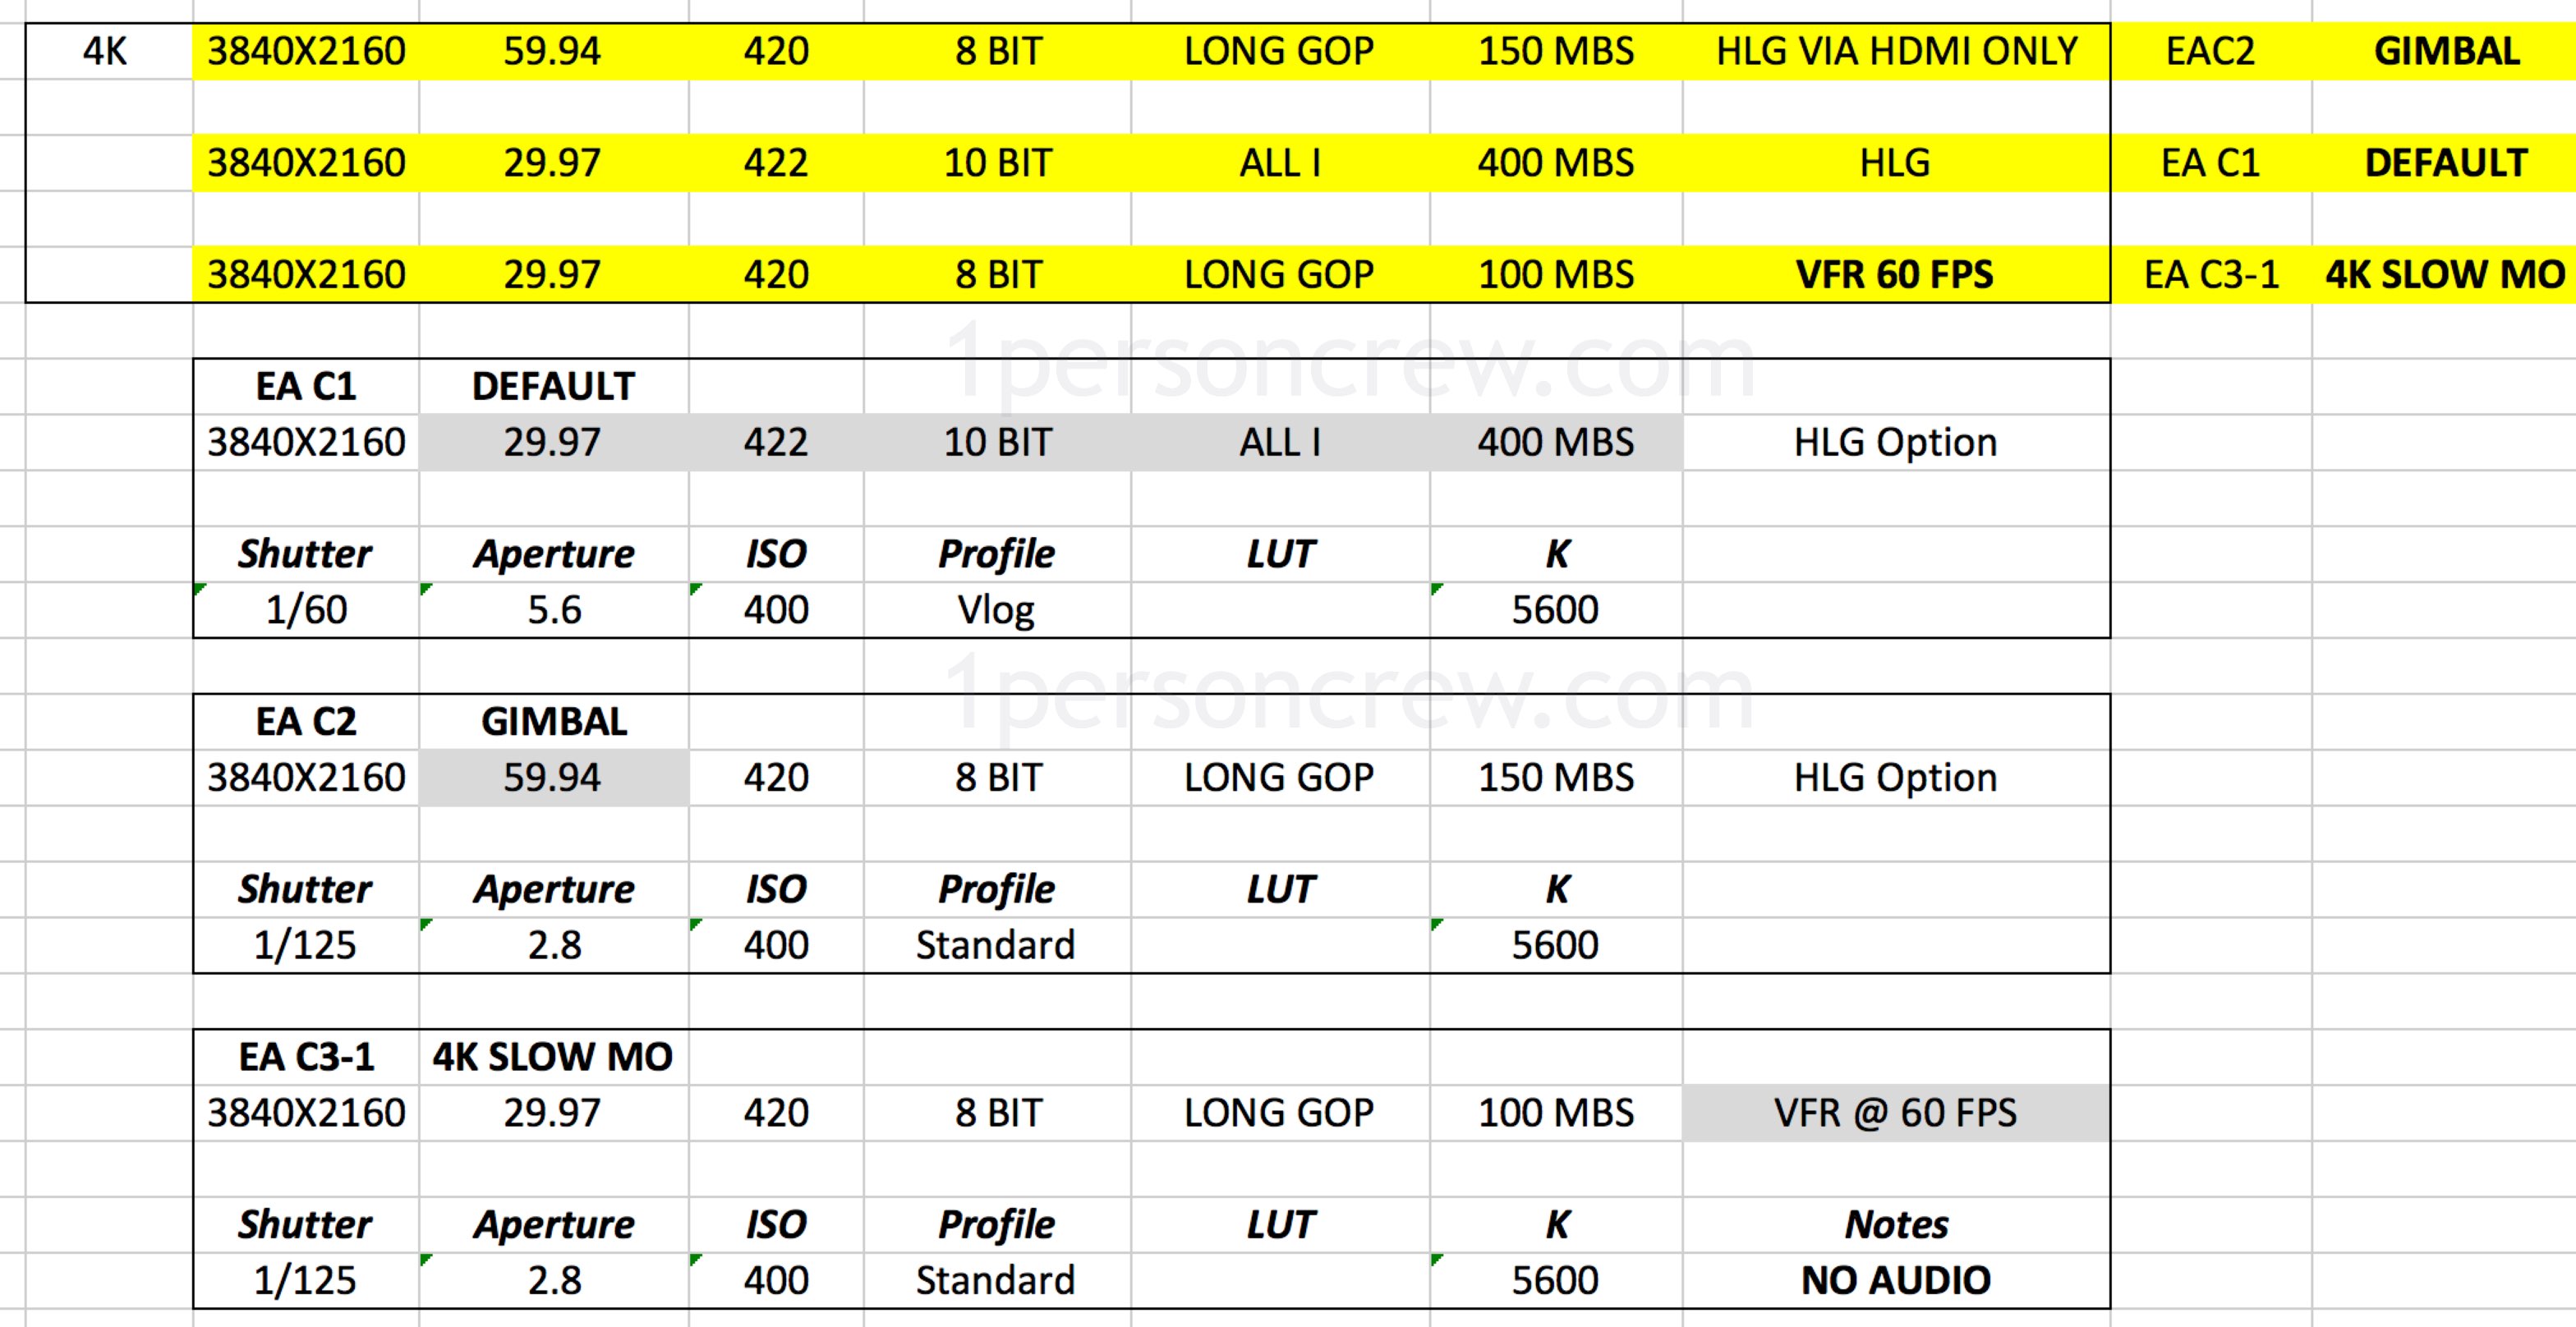
I did something only a super geek would do. Made a pot of coffee, opened Excel, and with my camera on hand re-organized Panasonic’s charts in a friendlier and more useful way.

As you can see on the far-right column, I also added EAC1, EAC2 and EAC3. Those are my Custom Menus saved to each camera so the starting point is always the same.

Note: I prefer to shoot UHD (3840X2160) over Cinema 4K (4096X2160) simply because it is easier to incorporate into HD (1920×1080) projects.

3840/2 = 1920 and 1080/2 = 1080

My Default Modes

Since most of my work ends up on YouTube or Vimeo 30 frames per second is a good starting point.

Doubling the frame rate (30×2) gives us a good starting point for your shutter speed, which is set at 1/60th of a second.

Ideally we want to extract as much data from the camera’s sensor as possible, so I choose 422 10-Bit.

VLog (similar to S-Log on Sony, C-Log on Canon, and very recently N-Log for Nikon) is set my default camera profile, so I have more room to enhance the story through color. Keep in mind that I only go this route if I know I’ll have enough time for post-production, otherwise I’d chose the “default” camera profile and call it a day. 

Upcoming “1 Person Crew” Master Class in Lisbon, Portugal. Come join us!

VLog has a minimum ISO of 400, so that’s that. An aperture of f5.6 is a nice starting point, as well as 5600 Kelvin for my White Balance.

EC2 is my Camera Setting for shooting on Gimbals and I use EC3 when I want/need to shoot at 60 frames per second and play with the footage in post. Here’s another post on Camera Movement.

The cool thing about this approach is that I can save my custom settings and import them into another Panasonic GH5 (running the same firmware version), without having to select every single option again.

Here’s how to perform that magic trick:

Working as a 1 Person Crew we constantly worry about audio, framing, exposure, directing and when to replace the batteries.  Anything we can do to save time and avoid potentially fatal mistakes is key. Saving Custom Camera profiles is in my opinion an underused but awesome trick. Enjoy!

Amazing Adobe Premiere Pro tips.

I’ve been following Scott Simmons for a while, and on every article or webinar I’ve always learned at least one new Adobe Premiere Pro editing tip from him.

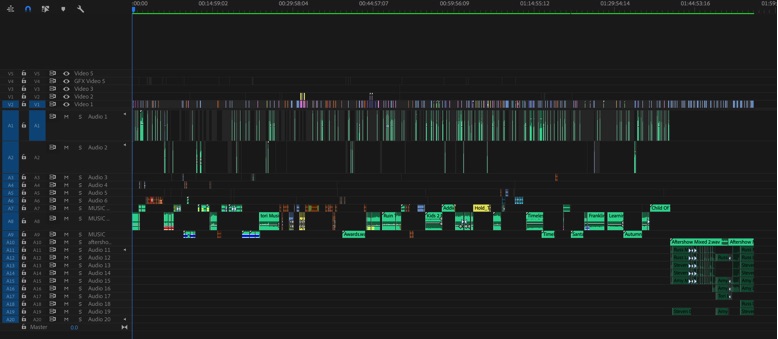
Today I wanted to extract and share the best tips from one of his most recents articles (“How I edited a complex feature documentary with in Adobe Premiere Pro with no crashes”), but there’s so much good info into a single article that I’m simply sharing the direct link -> http://bit.ly/2QnEjs6

Adobe Premiere Pro editing tips for documentary filmmakers.

Obviously,  the performance tips don’t ONLY apply to Adobe Premiere Pro, they could be used on any NLE. 

I found the RAID system Scott recommends on the article, the OWC ThunderBay 4 RAID 12TB, at least $150 cheaper here. It’s a beautiful beast!

1 Minute Tutorials – How to wirelessly record audio to an external monitor/recorder.

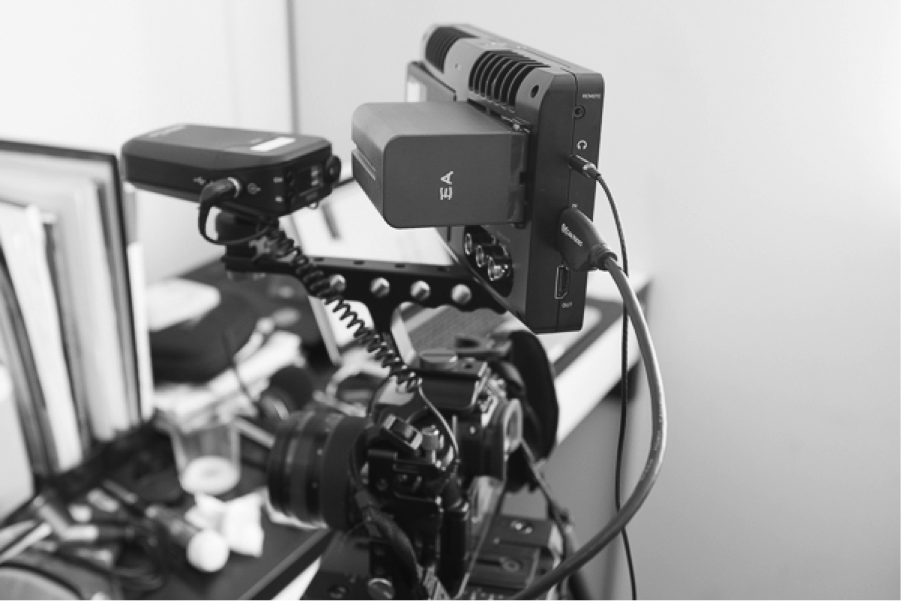
In this 1 Minute Tutorial you will learn how to quickly record audio from a wireless system like Rode’s RODELink Filmmaker Kit to an external monitor/recorder like the Atomos Ninja Inferno.

As an example I’ll be using a Panasonic Lumix GH5, but the steps apply to virtually any camera, wireless system, monitor.

Key Steps

1. Make sure the Transmitter and Receiver have been paired.
Just in case, here are the instructions to do just that.

2. Connect the camera to the external monitor/recorder via HDMI cable.

3. Connect the RECEIVER (RX) via a “3.5mm male to 3.5mm male” cable to the camera. This cable should be included with your RODELink Filmmaker Kit.

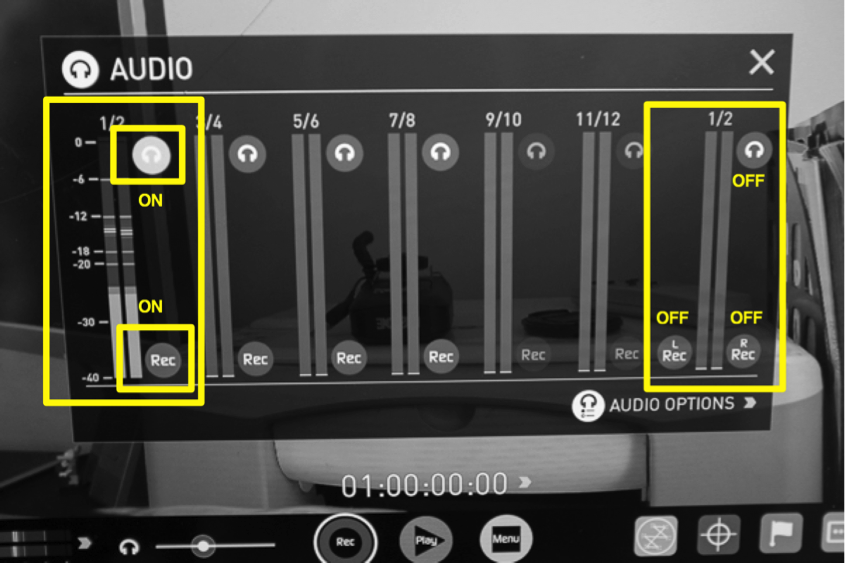
4. CRITICAL STEP: In The Atomos Ninja Inferno turn the volume ON and enable the RECORD buttons on the LEFT. Then make sure to turn OFF the volume and the record buttons on the RIGHT.

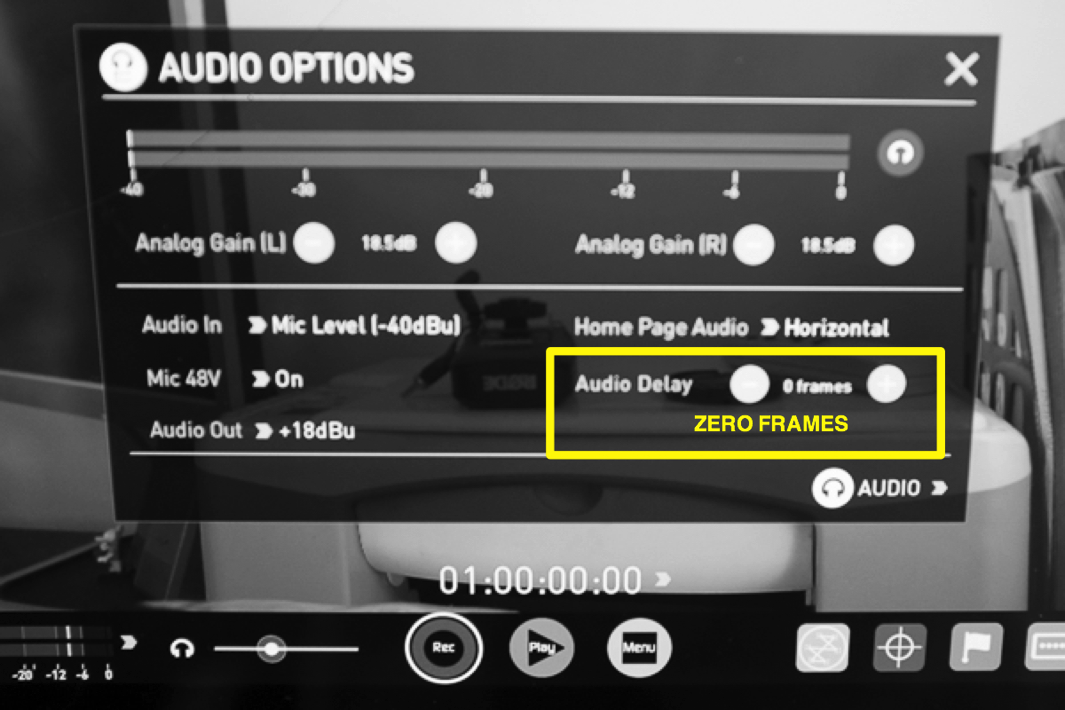
5. CRITICAL STEP: Under “Audio Options/Audio Delay” select ZERO (0) frames. This is the case when working with the Panasonic Lumix GH5, but you might need to adjust the Audio Delay settings for other cameras.

And that’s that.

But, why to get into all this to begin with? Because now we can have very long recording times AND embed high-quality audio to our high-quality footage. There’s no need to transcode nor sync anything in post saving lots of time. That’s why.