How to charge multiple batteries at once.

It makes no sense to have a super light laptop and/or camera system and having to carry a heavy bag full of chargers, adapters, and cords.

Also, I’m pretty sure I’m not the only one who has forgotten expensive chargers at hotels (Buenos AIres, Casablanca and Houston) and airports (Porto and Barcelona to name a few), or who has lost a cable that could NOT be replaced (try finding USB-C cables in Myanmar).

And what about spending 14 hours shooting on location, getting late at night to your hotel to dump the day’s footage, and not being able to go to bed because you have to make sure all the batteries are fully charged for the following day? It simply sucks.

So my goal was to find a simple way to charge multiple batteries at once, minimize the amount of chargers and cables, and make everything fit into the most compact package. Ah, and also super important, be able to use this setup anywhere in the world.

Let me introduce you to “the Octopus” a gadget I’ve been using (and fine-tuning) for quite a while. Right now I can charge seventeen (17) batteries and/or devices, with a system that weights only 2.12 pounds (or 0.96 kilos). And the best part, I only need ONE international adapter.

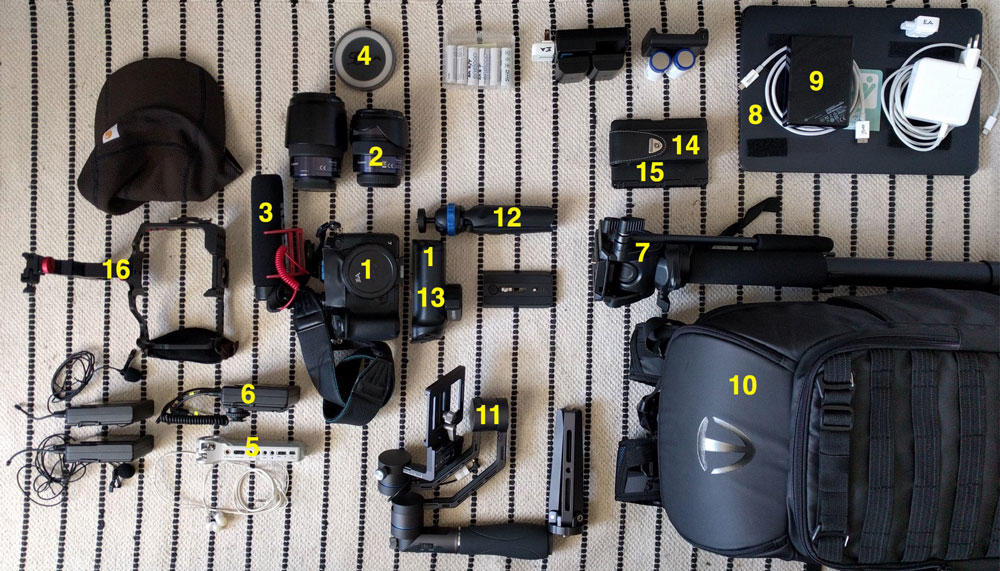
Let’s see what I have on my current setup:

Here’s what you’ll need to build a similar “Octopus”:

One last thing. I don’t know why, but sometimes a “brand name” battery costs more than two third-party batteries, sometimes even including the charger! I’ve using Wasabi batteries and Watson batteries for a long time and never noticed a performance difference against the “original” brand. I don’t know about other brands, but Wasabi and Watson work fine.

Check this out, ONE Sony NP-F970 costs $125.99. You can get the same battery under the “Watson” brand for almost half the price, $69.99. But for only $49.99 you can get TWO “Wasabi” batteries, with an adapter, plus a car charger AND a European plug. Wow!

Which camera bags are best for video shooters?

There are SO many camera bags, all claiming to be THE perfect one for your specific needs. Obviously that’s impossible. So which camera bags are best for the 1 Person Crew and why?

I’ve owned dozens of camera bags in the past 20 years. I actually used to work at a camera store so I was able to field test ANY bag I wanted for a weekend, and then buy it with a significant discount. Needless to say I ended up with a closet full of them, from very uncomfortable “Sling bags” to extra heavy “hard cases” to even a “floating backpack” that I used once….

Over the years I’ve been increasingly demanding when it comes to buying equipment, and this includes camera bags.

I’m always looking for three things: I want the bag to be comfortable, to have the right features (like compartments that are easy to reach for me, but not for pickpockets), and “the look.” I want something that looks nice, but doesn’t scream “Hey! I have $20,000 right here!”

When it comes to brands, I also have used them all. I want a company that keeps innovating and taking risks, that is using high-quality materials, but also offers a fair price, customer service and warranty. This is easier said than done, of course.

At my workshops I often hear attendees complain “$400 for a bag?!?!?! That’s a lot of money!”

But is it? If I’m putting $20,000, $30,000 or even $40,000 inside a bag that will take some serious beating for 5 years, is $400 really a bad investment? I don’t think so.

So, I currently use three kinds of bags, all made by the same company. The smallest bag is a Messenger style bag. That’s the one I use pretty much every day, for my laptop when I’m not shooting, and with a very compact setup, especially if I need very quick access to my camera.

In action in Fukuoka, Japan.

What’s inside that Mesenger Bag? Watch the video below to find out:

The second bag is a video backpack. That’s the one I’m taking with me pretty much every time I leave town. It goes next to me in a taxi, under my seat on a plane, and on my back the rest of the time. That bag NEVER leaves my side.

Everything I need (except a tripod) to shoot several interviews overseas.

The third bag is a hybrid bag, which means it’s a rolling case AND a backpack. That’s my carry-on bag, that rolls 90% of the time, and it’s on my back when I’m dealing with sand in Mexico, snow in Chicago, cobblestones in Lisbon, stairs in New York’s subway, and mud in Bali.

Scouting the only tea plantation in Europe (in the island of São Miguel, Portugal).

So, what about you? Do you have a favorite bag or packing tip? If so, please share your comments below.

DISCLAIMER
This article is not paid or sponsored by anyone. It reflects my own independent opinion. I only recommend companies and products that I trust. Some links might be affiliates, which means I may get a few pennies if you decide to purchase something.
Thanks in advance for your support!

MY VIDEO GEAR
Amazon

ONLINE COURSES
Lynda.com
Mini Tutorials
LinkedIn Learning

SOCIAL
YouTube: 1PersonCrew
Instagram: @1PersonCrew

[jetpack_subscription_form show_only_email_and_button=”true” custom_background_button_color=”undefined” custom_text_button_color=”undefined” submit_button_text=”Subscribe” submit_button_classes=”undefined” show_subscribers_total=”false” ]

The 1 Person Crew Travel Bag.

I recently presented a “Filmmaking Essentials for Photographersworkshop at Adorama in New York City. In case you are interested, you can watch the event here.

The premise of the event was simple: there are so many things we “need” to shoot video; from the obvious ones, like a camera and a lens, to other more obscure items like a versatile audio setup and a compact, fast and reliable hard drive to edit on the road. With so many brands, models, and price points to choose from, where do you even start?

I’ll go over the differences and similarities between shooting stills vs. motion, but a big section of the event will be focused on gear. What should you buy when getting started? When to upgrade? And which other tools should you seriously consider, even if you are an experienced pro?

After two decades of professional experience, I’ve (almost) mastered the art of packing everything I need into a single video backpack, messenger bag, or carry-on. It obviously depends on the project’s complexity, length and if I’m flying, driving, or using public transportation, but all of these set ups have one thing in common; there’s zero waste. I only bring with me what I consider truly essential, everything else stays behind.

This specific setup will allow me to shoot for a full day without recharging batteries, record a two people interview while getting very clean scratch sound, have a focal range from 24mm to 200mm (2.8 all the way), very quickly capture steady shots with my monopod as well as super stable gimbal shots. The best part is that everything fits in ONE backpack that goes under my airplane seat!

Want to know more? Register here for this FREE event, watch this online course on packing, check my complete kit, or buy the book (PDF, Kindle and Paperback).

ONLINE COURSES
Lynda.com
Mini Tutorials
LinkedIn Learning

MY VIDEO GEAR
Amazon

SOCIAL
YouTube: 1PersonCrew
Instagram: @1PersonCrew

DISCLAIMER
This article is not paid or sponsored by anyone. It reflects my own independent opinion. I only recommend companies and products that I trust. Some links might be affiliates, which means I may get a few pennies if you decide to purchase something.
Thanks in advance for your support!

[jetpack_subscription_form show_only_email_and_button=”true” custom_background_button_color=”undefined” custom_text_button_color=”undefined” submit_button_text=”Subscribe” submit_button_classes=”undefined” show_subscribers_total=”false” ]

Comparing 3 different wireless kits for filmmakers.

DISCLAIMER
This article is not paid or sponsored by anyone. It reflects my own independent opinion. I only recommend companies and products that I trust. Some links might be affiliates, which means I may get a few pennies if you decide to purchase something.
Thanks in advance for your support!

In my previous post I compared 6 different microphones on 6 configurations for filmmakers. Today I will compare 3 different wireless systems, once connected directly to a Panasonic GH5 , and a second time connected to a Zoom H1n field recorder.

The cool thing about these posts is that you will be able to listen to how each mic sounds while recording the same exact audio source, and judge the quality of each system by yourself.

Poison Apple Studios, a modern recording studio in Lisbon, Portugal

The Setup

The main goal was to test which mic/system would perform best under real-life situations for people working as a 1 Person Crew, so we chose one of the most popular cameras among indie filmmakers and the most basic field recorder we could find. For these tests I asked the help of Tiago Canadas, a professional audio engineer and owner of Poison Apple Studio, a professional audio facility in Lisbon. He chose a 30 second audio clip of a woman singing, and we meticulously set the mics at exactly the same distance and angle from the speakers.

Tiago hard at work.

Settings

We recorded all the microphones at 48000 Hz Stereo 24 bit, and used the same output settings to export the .wav files from Adobe Premiere Pro.

First we tested three wireless systems connected to the Panasonic GH5

Eduardo’s Comments: The three wireless systems performed very similarly andt he price for the three kits is almost identical. The RodeLink kit recorded more subtle sounds, and the Saramonic a bit less, but overall they seem extremely close.

See Tiago’s Comments at the end of the post.

Listen to all three samples and choose the one that you think is the highest-quality audio.

07 MicTests_RodeLink Wirelss Kit to GH5
08 MicTests_Comica Wireless Kit to GH5
09 MicTests_Saramonica Wireless Kit to GH5

And then we tested the same three wireless systems connected to a Zoom H1n

Eduardo’s Comments: The Saramonica and Rode wireless systems are very close, but the Rode seems a bit “crispier. The Comica wireless system captures a less details than the other two.

See Tiago’s Comments at the end of the post.

Listen to all three samples and choose the one that you think is the highest-quality audio.

10 MicTests_RodeLink Wireless Kit to H1N
11 MicTests_Comica Wireless Kit to H1N
12 MicTests_Saramonica Wireless Kit to H1N

Conclusions

Tiago’s Comments: The sound from all mics is poor, but this wasn’t a fair test for any of the mics. We should redo the test, adjusting each mic to perform its best and record actual human voices, not a recording.

Your Turn!

So here’s a question for you (the reader): If we redo this test, how would YOU like us to test these mics? Write your comments below, send me an email or even a Tweet.

[jetpack_subscription_form show_only_email_and_button=”true” custom_background_button_color=”undefined” custom_text_button_color=”undefined” submit_button_text=”Subscribe” submit_button_classes=”undefined” show_subscribers_total=”false” ]

MY VIDEO GEAR
Amazon

ONLINE COURSES
Lynda.com
Mini Tutorials
LinkedIn Learning

SOCIAL
YouTube: 1PersonCrew
Instagram: @1PersonCrew

Comparing 12 different microphones for filmmakers.

Tiago Carvalho, owner of Poison Apple Studio, a professional recording studio in Lisbon, Portugal.

DISCLAIMER
This article is not paid or sponsored by anyone. It reflects my own independent opinion. I only recommend companies and products that I trust. Some links might be affiliates, which means I may get a few pennies if you decide to purchase something.
Thanks in advance for your support!

In this post I compare 6 different microphones for filmmakers. On the next post I will compare 3 different wireless systems on 2 different configurations each. On both posts you will see the exact gear we used for the tests, and you will be able to listen to how each mic sounds while recording the same exact audio source. Sounds good? Let’s go!

The Importance of Clean Audio.

I strongly believe sound is the most important element on a film. We can have the most amazing story, stunning visuals and masterful editing and transitions, but add crappy sound and the viewer will tune out immediately.

For a number of reasons I own different audio sets, but never actually took the time to test them side by side. Until now. A few days ago I called my incredibly talented friend Tiago Canadas who owns Poison Apple Studios, a professional recording studio in Lisbon.

“Poison Apple Studios is a modern recording facility for today´s musician, band, producer, equipped with some of the most cutting-edge and old-school gear within an environment that is dedicated to one thing: creating great music. “

I’ve always wondered, “how long does it take to learn what each button does?”
Poison Apple Studios, a modern recording studio in Lisbon, Portugal.
Not exactly 1 Person Crew audio gear.

Why these tests?

I often joke about how many people spend all their money on a camera, get the kit (aka shitty) lens that comes with it, and if there’s any money left they buy the crappiest tripod in the world. It should be the opposite, as a good solid tripod can last 20 years, a great lens at least 5 to 10 years, and the cameras are being replaced by cheaper, better, faster alternatives every 18 months or less. Well, the same goes with audio gear. You can have a great field recorder and a professional mic, add a low-quality XLR cable and you get low-quality sound.

I’ve set a few professional goals regarding sound for 2019; pay more attention to audio recording while on location, add more sound effects to my projects, get better at choosing the music that enhances the story, and get a better technical understanding of mixing and mastering.

We spent an afternoon designing a test to compare three XLR shotgun mics, three on-camera shotgun mics, three wireless systems connected to a camera, and the same three wireless systems connected to a field recorder.

The Setup

At some point we considered plugging the mics to Pro Tools and go nuts analyzing the different tracks. But the main goal was to test which mic/system would perform best under real-life situations for people working as a 1 Person Crew, so we chose one of the most popular cameras among indie filmmakers and the most basic field recorder we could find. Tiago chose a 30 second audio clip of a woman singing, and we meticulously set the mics at exactly the same distance and angle from the speakers.

Tiago hard at work.

The Settings

We recorded all the microphones at 48000 Hz Stereo 24 bit, and used the same output settings to export the .wav files from Adobe Premiere Pro.

We tested three on-camera shotgun mics connected to a Panasonic GH5

Eduardo’s Comments: Saramonic mini shotgun is as good as the rode video mic go that I’ve used for many many years. The Panasonic shotgun picks up a lot more ambient sound than the other two shotgun mics. The Saramonic Vmic Mini and Rode VideoMic GO seem even in quality (and price).

See Tiago’s Comments at the end of the post.

Listen to all three samples and choose the one that you think is the highest-quality audio.

01 MicTests_SaramonicMiniShotgun on GH5
02 MicTests_RodeVideoMicGo on GH5
03 MicTests_PanasonicShotgun on GH5

We tested three XLR shotgun mics connected to a Panasonic GH5 using Panasonic’s DMW XLR1 Adapter

Eduardo’s Comments: This was not a fair competition for the Audio-Technica, as it is a completely different type of mic. The Rode NTG2 has a crisper sound than the Saramonic Shotgun. To me the Rode NTG2 performed better on this test..

See Tiago’s Comments at the end of the post.

Listen to all three samples and choose the one that you think is the highest-quality audio.

04 MicTests_AudioTechnica on GH5 w XLR1 Adapter
05 MicTests_RodeNTG2 on GH5 w XLR1 Adapter
06 MicTests_SaramonicShotgun on GH5 w XLR1 Adapter

Conclusions

Tiago’s Comments: The sound from all mics is poor, but this wasn’t a fair test for any of the mics. We should redo the test, adjusting each mic to perform its best and record actual human voices, not a recording.

On the next post I’ll share the second part of these test, using three different wireless mic kits (with the same set up) on two different recording devices.

Your Turn!

So here’s a question for you (the reader): If we redo this test, how would YOU like us to test these mics? Write your comments below, send me an email or even a Tweet.

[jetpack_subscription_form show_only_email_and_button=”true” custom_background_button_color=”undefined” custom_text_button_color=”undefined” submit_button_text=”Subscribe” submit_button_classes=”undefined” show_subscribers_total=”false” ]

MY VIDEO GEAR
Amazon

ONLINE COURSES
Lynda.com
Mini Tutorials
LinkedIn Learning

SOCIAL
YouTube: 1PersonCrew
Instagram: @1PersonCrew

How I Use Hard Drives for Video Productions.

On my last post, I shared where to find information about reliable hard drives and a couple of people asked “How is this applicable to a 1 Person Crew video production?”

Well, if I know that a specific 3TB drive from a certain brand has a 50% failure rate, that’s all I need to know to not even consider getting it, regardless its price or features.

Once I know which brands and sizes are the most reliable, I set up my workflow using three hard drives. On this video tutorial I quickly explain why:

Takeaways

  • For video production, you only want hard drives that are 7200RPM, not 5400 RPM.
  • Keep only your OS and Applications on your computer’s internal hard drive.
  • Keep all your project’s assets in ONE location. It’s good for productivity and peace of mind.
  • An USB-powered drive is almost always slower than an AC-powered drive.
  • Having a clear and consistent back up strategy is essential. Don’t wait until it’s too late!

Solid Sate Drives

Solid state drives are still very expensive, but they tiny, extremely durable, and they are coming down in price.

On location, I like using cheaper internal solid state drives like these to backup my footage.

How are you setting up your hard drives for video production? Leave your comments below.

ONLINE COURSES
Lynda.com
Mini Tutorials
LinkedIn Learning

MY VIDEO GEAR
Amazon

DISCLAIMER
This article is not paid or sponsored by anyone. It reflects my own independent opinion. I only recommend companies and products that I trust. Some links might be affiliates, which means I may get a few pennies if you decide to purchase something.
Thanks in advance for your support!

SOCIAL
YouTube: 1PersonCrew
Instagram: @1PersonCrew

[jetpack_subscription_form show_only_email_and_button=”true” custom_background_button_color=”undefined” custom_text_button_color=”undefined” submit_button_text=”Subscribe” submit_button_classes=”undefined” show_subscribers_total=”false” ]

When to replace your hard drives.

All hard drives will die. The question is not if, but when. This is why finding reliable hardware AND having a solid back up strategy is extremely important.

Finding Reliable Information.

Reading tech reports like Backblaze’s annual report on hard drives is important, because they provide priceless information on which brands and models NOT to buy. At the end of 2018 Backblaze was monitoring 104,954 hard drives used to store data, so they REALLY know which hard drives are good, and which ones should be avoided.

For example:

“Based on 1,220 drives and nearly 500,000 drive days, the AFR (Annualized Failure Rate) of the Seagate 10 TB drives continue to impress. For 2018 it was just 0.33%.”

When can you or I test a thousand hard drives, let alone a hundred thousand? Never, that’s when.

Last year alone, Backblaze had 180 Western Digital 3TB drives remaining, and ALL of them where removed and replaced with 12TB drives. Sometime this year they plan to replace all of their 4TB and 6TB drives and upgrade them to 14, 16, or even 20TB drives.

Annualized Hard Drive Failure Rates from January 2018 to December 2018.
Annualized Hard Drive Failure Rates comparing 2016, 2017 and 2018.
Annualized Hard Drive Failure Rates from 2013 to 2018.

Key Stats.

There are a LOT of useful gems we can extract from Backblaze’s 2018 report:

  • Backblaze replaced 3TB, 4TB, and even a handful of 6TB drives with new 12TB drives. The drives replaced are about 4 years old.
  • The failure rates of all of the larger drives (8, 10, and 12 TB) are very good: 1.21% AFR or less.
  • In September 2018 Backblazde added 79 12TB drives, and as of this publication, none of them have failed.
  • The Seagate 10TB drives, which have been in operation for over 1 year now, are performing very nicely with a failure rate of 0.48%.
  • In 2016 the average size of hard drives they had was 4.5 TB. By 2018 the average size had grown to 7.7 TB.
  • The 2018 annualized failure rate of 1.25% was the lowest by far of any year they’ve recorded.
  • The Seagate 10 TB drives continue to impress as their AFR for 2018 was just 0.33%. That’s based on 1,220 drives and nearly 500,000 drive days, making the AFR pretty solid.
  • None of their Toshiba 5 TB drives has failed since 2016.

Do you find this info useful? If so, leave your comments below.

MY VIDEO GEAR
Amazon

ONLINE COURSES
Lynda.com
Mini Tutorials
LinkedIn Learning

DISCLAIMER
This article is not paid or sponsored by anyone. It reflects my own independent opinion. I only recommend companies and products that I trust. Some links might be affiliates, which means I may get a few pennies if you decide to purchase something.
Thanks in advance for your support!

SOCIAL
YouTube: 1PersonCrew
Instagram: @1PersonCrew

[jetpack_subscription_form show_only_email_and_button=”true” custom_background_button_color=”undefined” custom_text_button_color=”undefined” submit_button_text=”Subscribe” submit_button_classes=”undefined” show_subscribers_total=”false” ]

Demystifying Recording Options on the Panasonic GH5.


When working as a 1 Person Crew we have plenty of things to worry about. Here are some underused tricks I use to save lots of time and minimize potentially fatal mistakes.

First, let’s face it. I’m a geek. I am one of the very few people who not only READ instruction manuals, but actually ENJOY doing so. Done. My public confession is out.

I have used way too many cameras (just ask my accountant, my wife or simply check the screenshot below). My current favorites for documentary work and short films are the Sony FS7 and Canon C200 (respectively) 

I also have been using the Panasonic Lumix line since the GH3, not only for their small form factor, portability, and image quality, but also because of their incredible versatility. You could adapt a Panasonic Lumix GH4 or GH5 to virtually any existing workflow, be it AVCHD, MP4, MOV, HD, 4K or Cinema 4K. That’s incredible!

Screenshot from the Panasonic GH5 Manual.

Recording Options on the Panasonic GH5.

Today’s article is about choosing the right settings for a specific project. I usually bring at least two cameras on every assignment. I like to save identical settings on them, so when I turn the cameras on, they match exactly, every time. This saves a tremendous amount of time and minimizes potential mistakes.

Here are more screenshots from the Panasonic GH5 Manual, which seems perfectly designed to scare people away. The charts do not reflect the most recent firmware version (v2.3) for the Panasonic GH5.

My Ultra Geeky Approach

I did something only a super geek would do. Made a pot of coffee, opened Excel, and with my camera on hand re-organized Panasonic’s charts in a friendlier and more useful way.

As you can see on the far-right column, I also added EAC1, EAC2 and EAC3. Those are my Custom Menus saved to each camera so the starting point is always the same.

Note: I prefer to shoot UHD (3840X2160) over Cinema 4K (4096X2160) simply because it is easier to incorporate into HD (1920×1080) projects.

3840/2 = 1920 and 1080/2 = 1080

My Default Modes

Since most of my work ends up on YouTube or Vimeo 30 frames per second is a good starting point.

Doubling the frame rate (30×2) gives us a good starting point for your shutter speed, which is set at 1/60th of a second.

Ideally we want to extract as much data from the camera’s sensor as possible, so I choose 422 10-Bit.

VLog (similar to S-Log on Sony, C-Log on Canon, and very recently N-Log for Nikon) is set my default camera profile, so I have more room to enhance the story through color. Keep in mind that I only go this route if I know I’ll have enough time for post-production, otherwise I’d chose the “default” camera profile and call it a day. 

Upcoming “1 Person Crew” Master Class in Lisbon, Portugal. Come join us!

VLog has a minimum ISO of 400, so that’s that. An aperture of f5.6 is a nice starting point, as well as 5600 Kelvin for my White Balance.

EC2 is my Camera Setting for shooting on Gimbals and I use EC3 when I want/need to shoot at 60 frames per second and play with the footage in post. Here’s another post on Camera Movement.

The cool thing about this approach is that I can save my custom settings and import them into another Panasonic GH5 (running the same firmware version), without having to select every single option again.

Here’s how to perform that magic trick:

Working as a 1 Person Crew we constantly worry about audio, framing, exposure, directing and when to replace the batteries.  Anything we can do to save time and avoid potentially fatal mistakes is key. Saving Custom Camera profiles is in my opinion an underused but awesome trick. Enjoy!

Being unfaithful (and testing new mics).

I’ve been using Rode wireless mics for many years and never expected to change. There’s even a blog post on why I have been completely loyal to Rode for so long.

But, for the past couple of weeks I’ve been using a new set of wireless mics from a company I didn’t know: Comica.

Features

The complete kit comes in a nice hard case, and offers all the expected features:

  • 96-channels
  • Auto scanning
  • Real time monitoring
  • AA batteries
  • Lavalier mics included

Some other features stand out:

  • Adjustable RF signal strength which can be lowered to reduce power consumption and increase battery time 
  • A working distance up to 394 feet (120 meters) in a open area

But there’s ONE feature that tipped the scale for me: two transmitters can be used with only one receiver.

Audio Workflow

In practical terms I need only one receiver connected to an audio recorder (like this or this or this) and can record two people simultaneously. As you can see below, as a safety net and to record high-quality scratch audio, I used a Rode shotgun mic on my camera. Later in post I simply duplicate the track, keep subject A on Channel Left and subject B on Channel Right, and sync the audio and footage manually in a few seconds using PluraEyes.

The 1 Person Crew Approach

This past weekend I shot at a wonderful winery in Alentejo, Portugal. I previously wrote how I found this amazing location.

I wanted to document my two main characters, one winemaker on the field collecting the grapes with a small group of people, and a second winemaker at the shop, receiving and pressing the grapes. They both were working at the same time at two different locations.

Do you shot on the field with the beautiful early morning light and miss an event that happens only once a year, OR do you document the grape crushing process and get b-roll later with super harsh mid-day light?

As a 1 person crew my options were very limited. I did run like crazy all day to get enough footage of both, but by having a wireless mic on each subject the whole time I was able to also capture wonderful moments. For example, the small group of farmers singing and joking while picking grapes, and at the same time one of the winemakers describing his winemaking philosophy, and why they choose to use ancient methods over modern ones.

Trying to record a long and formal interview on the most important and busiest day of the year for the subjects was out of the question. And if you have done any interviews before, you know it is extremely rare to get this kind of spontaneous sound bites.

Pros and Cons

I used this kit for about 5 hours straight on a single set of AA batteries per unit, which is very impressive. I always use and recommend Eneloop rechargeable batteries, they cost a bit more but last much longer.

I’ve seen some complaints on Amazon about the quality of the mics. I haven’t noticed any issues, but will test the wireless transmitters with other lavalier mics in case I’m missing something.

There are also a few complaints about the battery holders (aka cartridges).  I agree with that one. The batteries are super tight, so I’d recommend getting three extra sets of battery holders to swap batteries much faster.

There you have it; how to record two people at two different locations with only one receiver and getting fantastic results. The 1 person crew approach. 

1 Minute Tutorials – How to wirelessly record audio to an external monitor/recorder.

In this 1 Minute Tutorial you will learn how to quickly record audio from a wireless system like Rode’s RODELink Filmmaker Kit to an external monitor/recorder like the Atomos Ninja Inferno.

As an example I’ll be using a Panasonic Lumix GH5, but the steps apply to virtually any camera, wireless system, monitor.

Key Steps

1. Make sure the Transmitter and Receiver have been paired.
Just in case, here are the instructions to do just that.

2. Connect the camera to the external monitor/recorder via HDMI cable.

3. Connect the RECEIVER (RX) via a “3.5mm male to 3.5mm male” cable to the camera. This cable should be included with your RODELink Filmmaker Kit.

4. CRITICAL STEP: In The Atomos Ninja Inferno turn the volume ON and enable the RECORD buttons on the LEFT. Then make sure to turn OFF the volume and the record buttons on the RIGHT.

5. CRITICAL STEP: Under “Audio Options/Audio Delay” select ZERO (0) frames. This is the case when working with the Panasonic Lumix GH5, but you might need to adjust the Audio Delay settings for other cameras.

And that’s that.

But, why to get into all this to begin with? Because now we can have very long recording times AND embed high-quality audio to our high-quality footage. There’s no need to transcode nor sync anything in post saving lots of time. That’s why.