Businesses of all sizes need better ways to offer their products and services to the world, and video is clearly the new language of brand communication. Learn how to plan a multi-camera production, increase production value through camera movement, and create cinematic lighting on a budget. Plus, get tips for adding great music and sound effects, saving time and money in post-production, and more!
All the video gear featured on (and used to produce) this course is available here.
Some links might be affiliates. If you purchase gear with them, I might receive a small commission at no additional cost to you. Thanks in advance for your support!
Questions?
Feel free to ask any questions regarding this course (on anything else) on Instagram.
From planning a shoot to DIY lighting solutions, learn how to produce professional videos with very little gear, tight deadlines, shoestring budgets, andno crew.
All the video gear featured on (and used to produce) this course is available here.
Some links might be affiliates. If you purchase gear with them, I might receive a small commission at no additional cost to you. Thanks in advance for your support!
Questions?
Feel free to ask any questions regarding this course (on anything else) on Instagram.
I’m very thankful with Benro for putting together a webinar to discuss the 1PersonCrew Approach. The host was my dear friend Matt Hill, who is not only an awesome guy, but also a multi-talented artist in his own right. Matt’s project with handmade paper dresses and long-exposure portraiture is jaw-dropping.
I hope attendees found the webinar fun and and helpful. In case you missed it (or want to rewatch it) here’s the full recording. Feel free to leave comments and questions below, or hit me on Instagram.
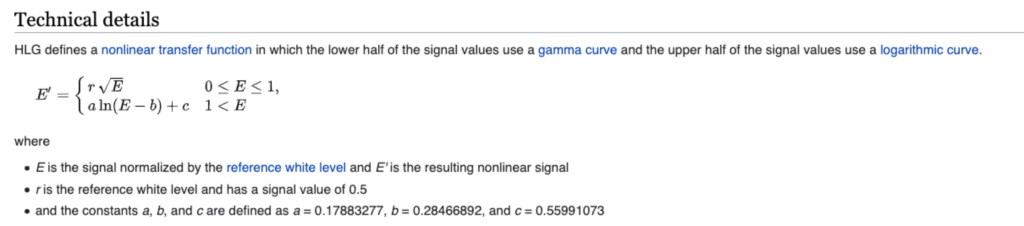
A quick Google search shows you that HLG (Hybrid Log Gamma) has been around for a while, yet, it’s something I didn’t really understand until very recently.
In today’s post I’ll share the most useful things I’ve learned about HLG, and when/how to use it.
History
You might remember several HLG-related announcements back in 2017:
“Panasonic releases firmware update 2.0 for the Panasonic Lumix DC-GH5 with added support for HLG recording.”
“Adobe Systems updates Adobe Creative Cloud which includes support for HLG.”
“Apple releases firmware update for Final Cut Pro X which includes support for HLG.”
“Sony supports HLG on 2017 4K TVs with a firmware update.”
After reading about this, and watching some “official videos” my reaction was “meh, whatever.”
What the hell is HLG?
This is exactly why I waited so long to play with HLG.
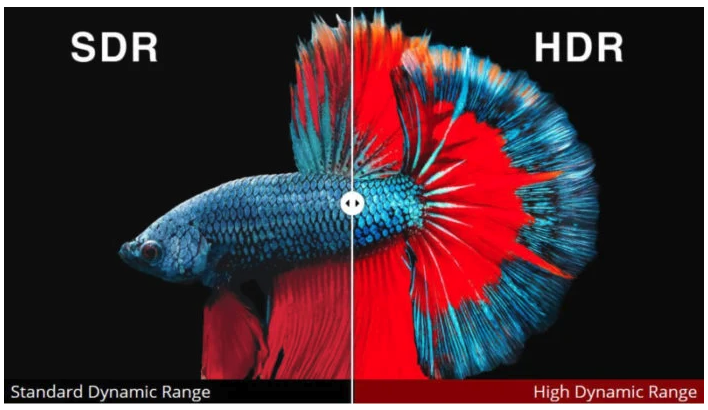
Glad you asked. HLG stands for Hybrid Log Gamma, which according to Wikipedia is “a backwards-compatible high dynamic range (HDR) standard that was jointly developed by the BBC and NHK.”
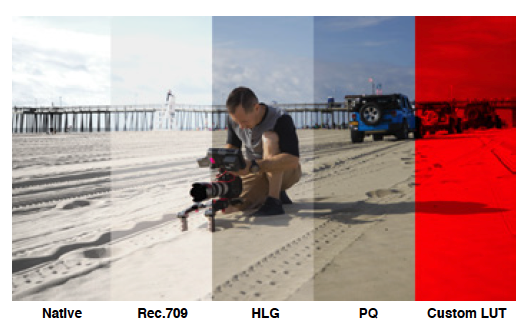
One of the most interesting aspects of HLG is that it is essentially HDR, but compatible with existing standard displays, reducing complexity and cost for both equipment manufacturers and content distributors.
Interesting findings from my recent quest to understand the HLG standard
HLG is royalty-free
HLG is supported by HDMI 2.0b, HEVC, and H.264/MPEG-4 AVC
HLG is currently being used by many video services including YouTube
Takeaway: HLG is a free HDR standard that works on normal monitors and is widely supported. Got it.
But,what’s the difference between HDR and HLG?
This gets trickier and unnecessarily dense. So, let’s keep it super simple. There are three main flavors of HDR:
Dolby Vision Involves a complex and expensive workflow, not 1PersonCrew friendly.
HDR10+ The most available format, but also requires labor-intensive grading.
HLG
In a nutshell, HLG aims to solve two big problems. The first problem is that Dolby Vision and HDR10+ aren’t suitable for broadcast signals. The second problem HLG is trying to solve is the need to produce two version (HDR and non-HDR) of the same content. In theory, with HLG one can shoot, edit, and grade, and the final videos will look good both on normal monitors and on fancy monitors. This is huge!
Takeaway: HLG offers similar advantages of shooting HDR, but the key difference is that both normal (SDR) monitors, and super fancy (HDR) monitors can display HLG footage.
Now the real important question: Do I need HLG?
As always, it depends. I like the simple approach Atomos takes on this matter:
“The first step in HDR is to recognize you have a HDR scene. Look for a good range of contrast across the brightest and darkest parts of your image and also across the color and tonal range as each color also contains its own brightness or luminance information. Secondly ensure you are sending a Log signal into the Ninja V so that you are recording the HDR Log information. The main impact of HDR is apparent in the specular highlights and bright areas. The areas that would have previously been ‘blown out’ will now contain visible detail and information to enhance your content. HDR provides more headroom allowing you to show more detail.”
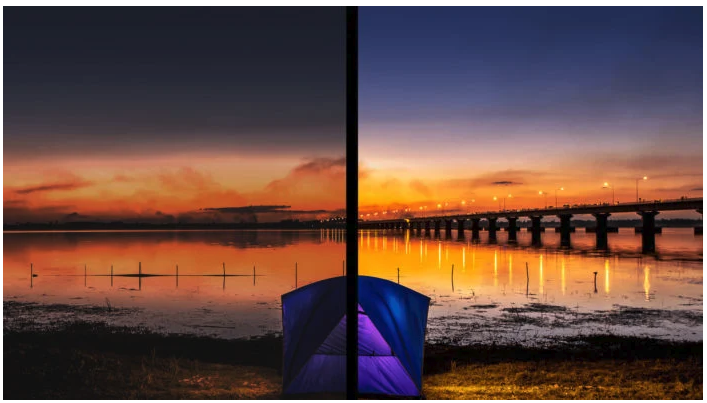
Simple. So, if you are facing a scene with a lot of dynamic range, with deep shadows and bright highlights, then it might make scene to shoot HLG.
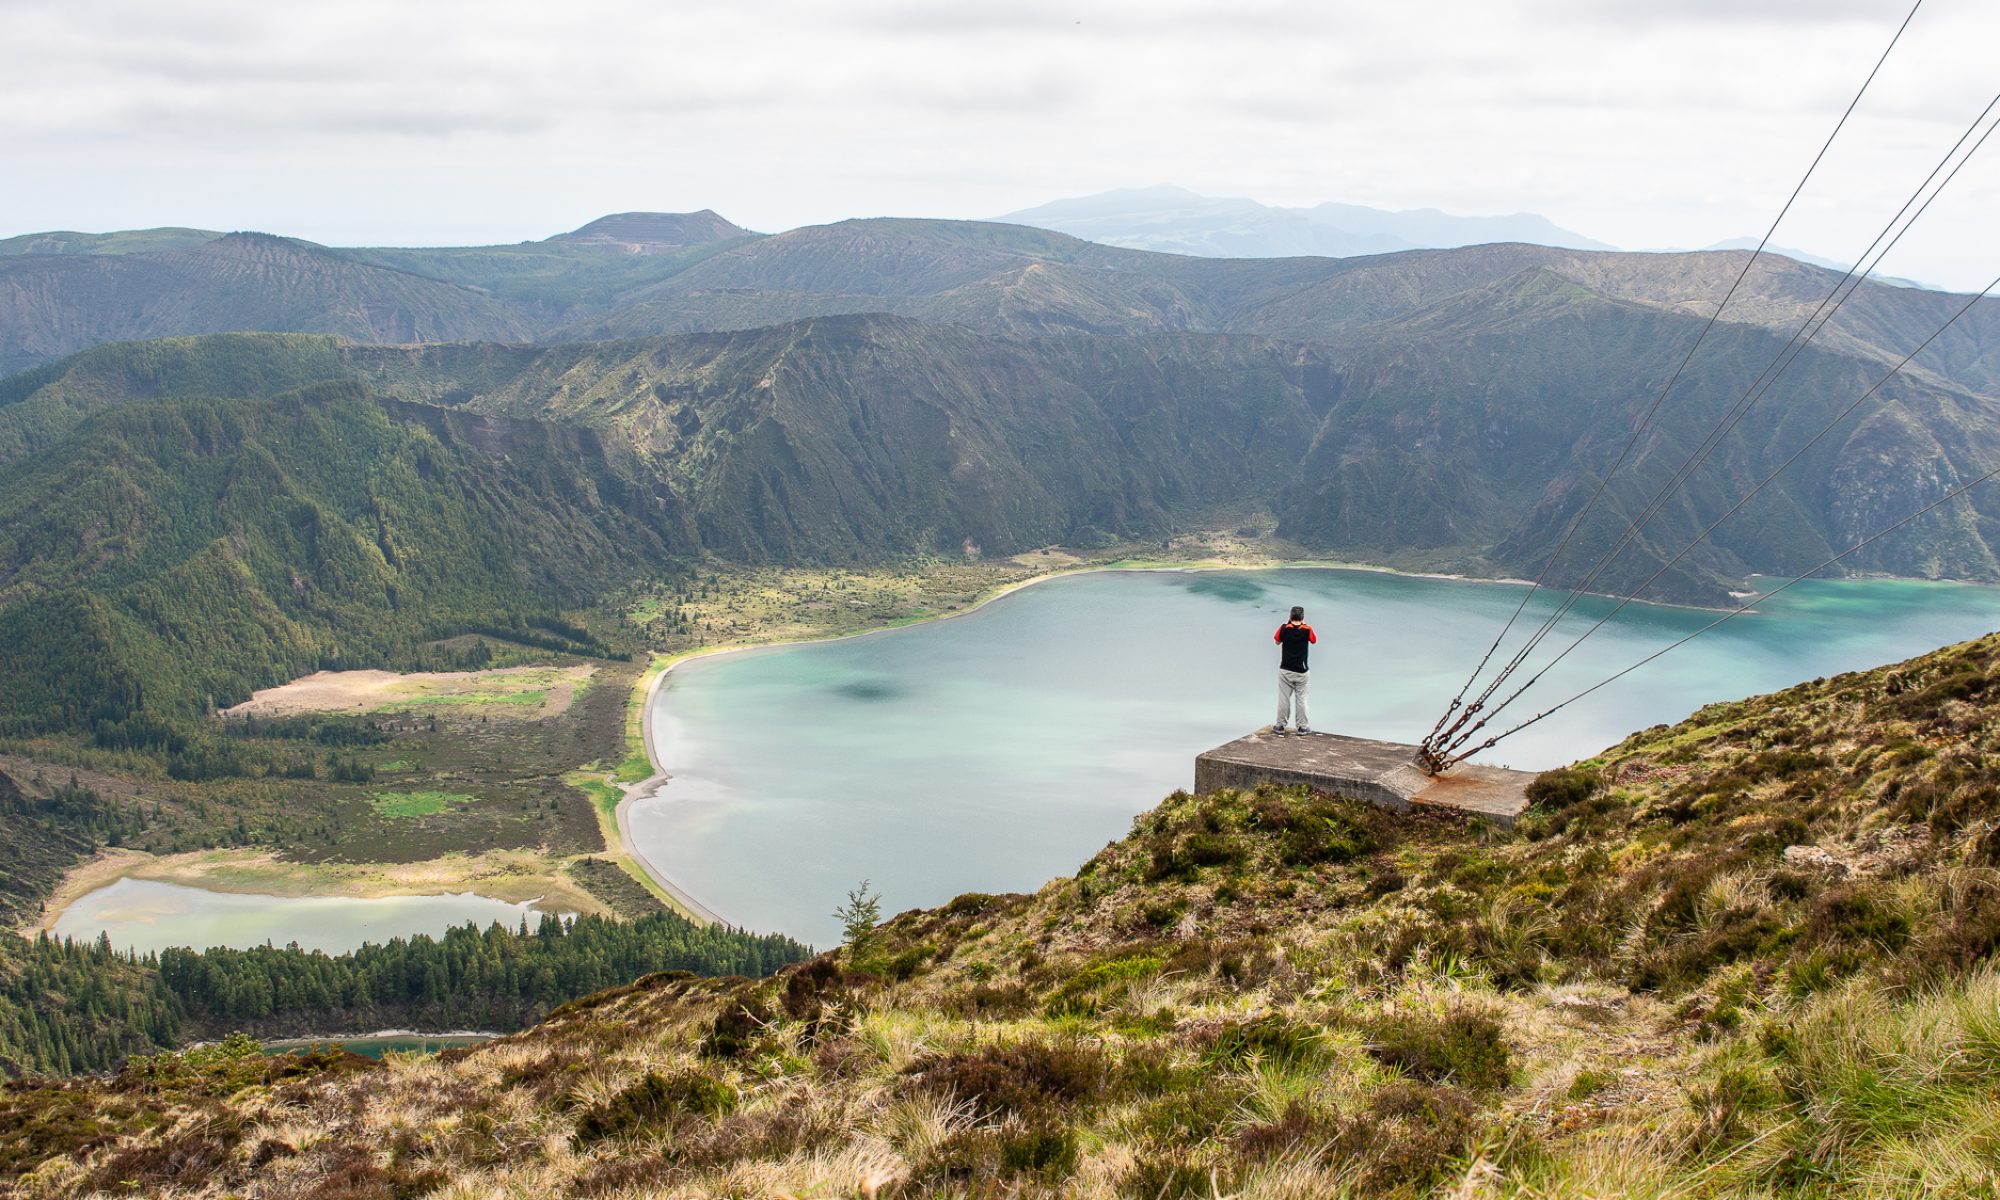
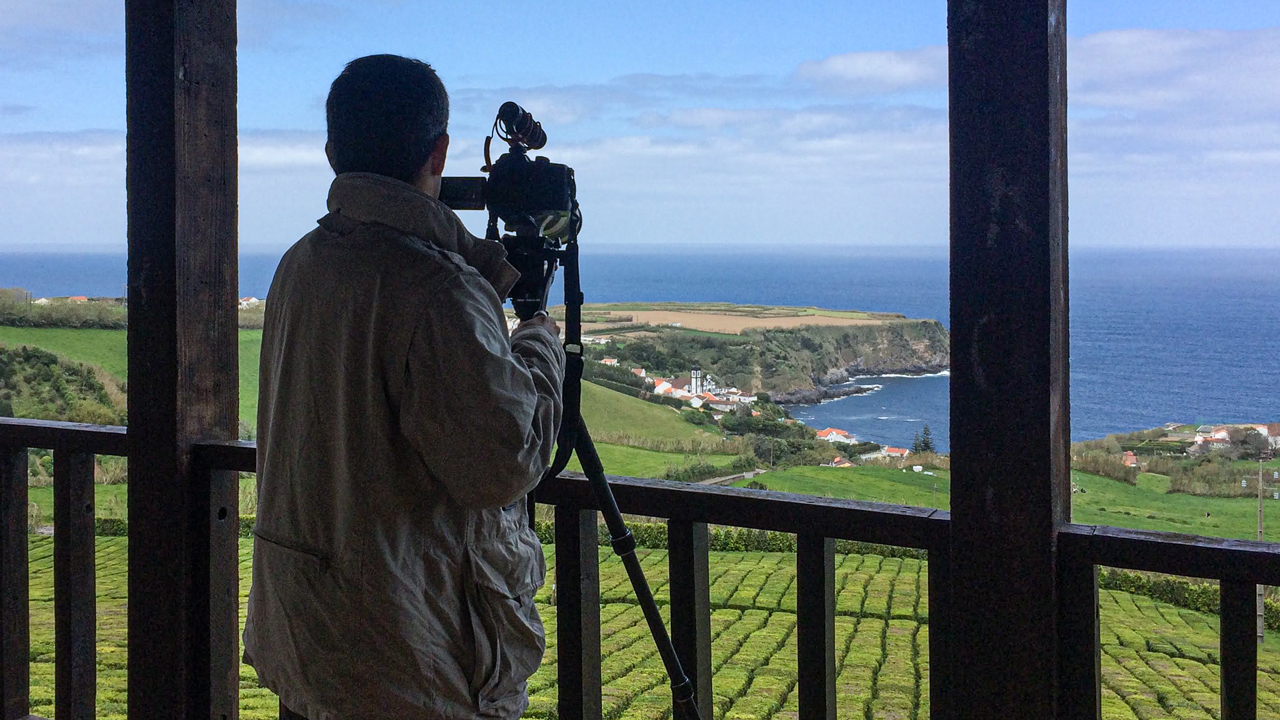
I can definitively see the benefit of using HLG on some of the Artisans Stories I’ve been producing, especially when working with available light and very bright locations/exteriors.
How to use it?
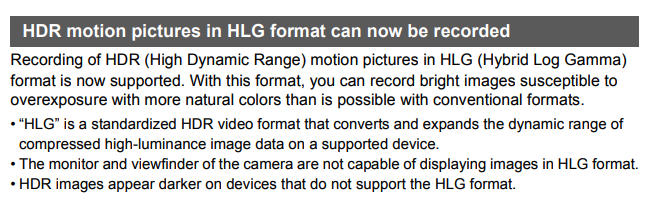
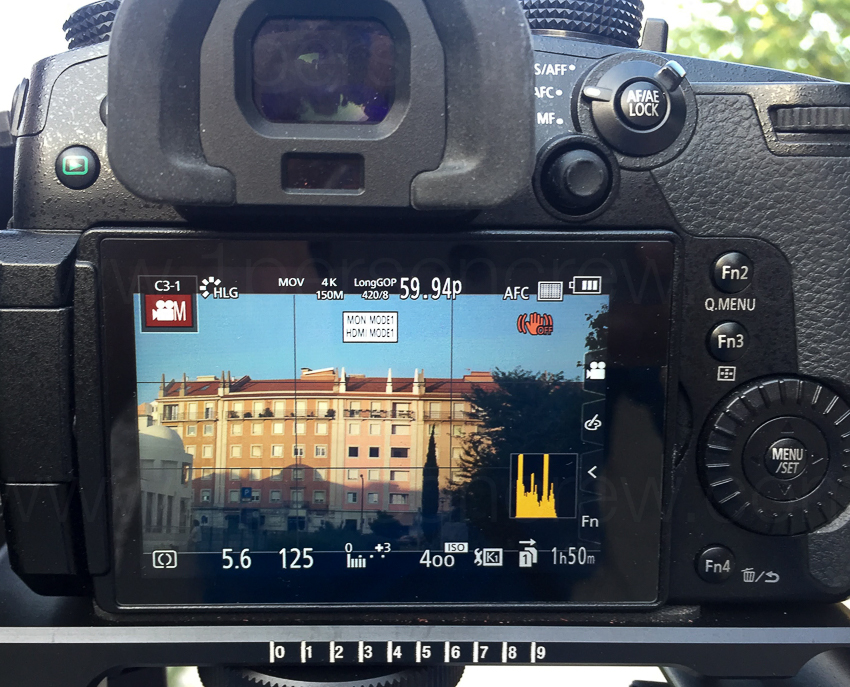
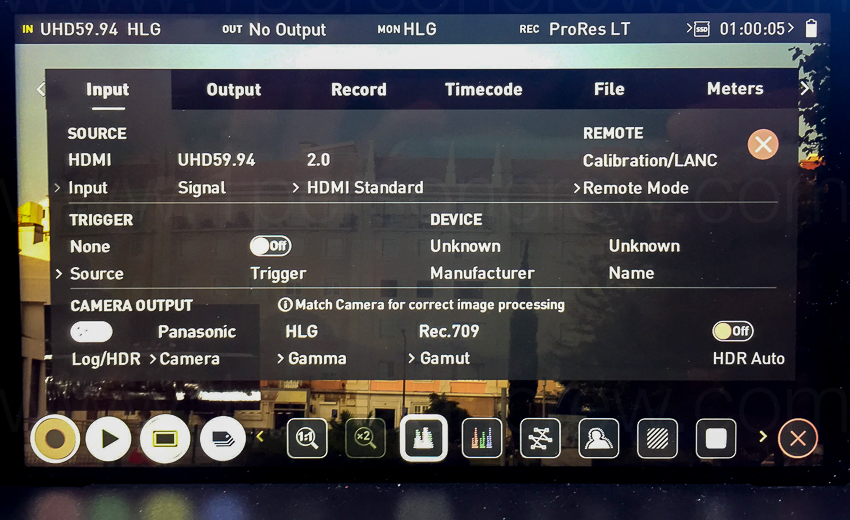
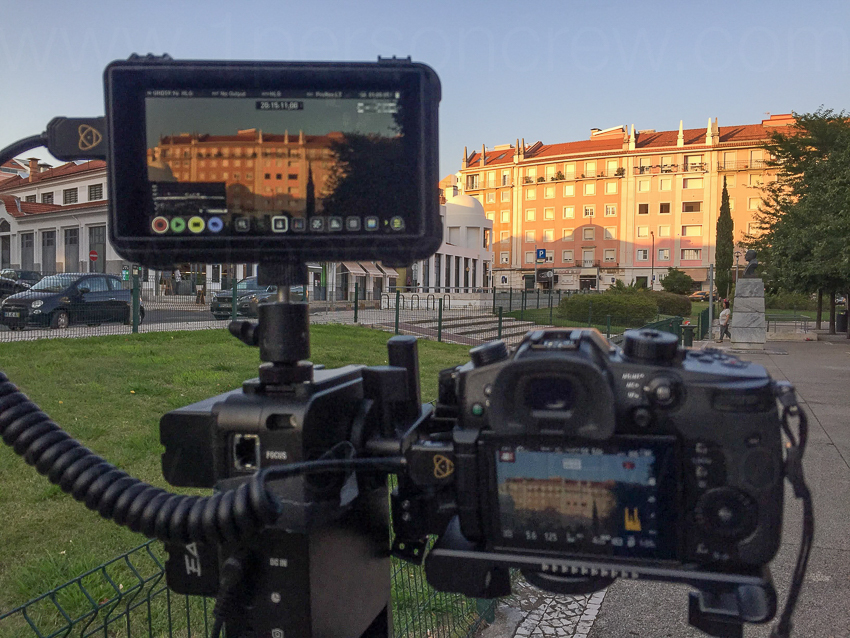
Obviously, we need to start with a camera that supports HLG. In my case, I have easy access to a Panasonic GH5. What’s very interesting about the GH5 is that it supports recording, BUT not displaying HLG.
To set up the camera, we need follow the instruction on this online PDF manual (Page 4).
After several tests, my recommended settings for the GH5 are:
Select “Standard” as the Photo Style (aka Profile)
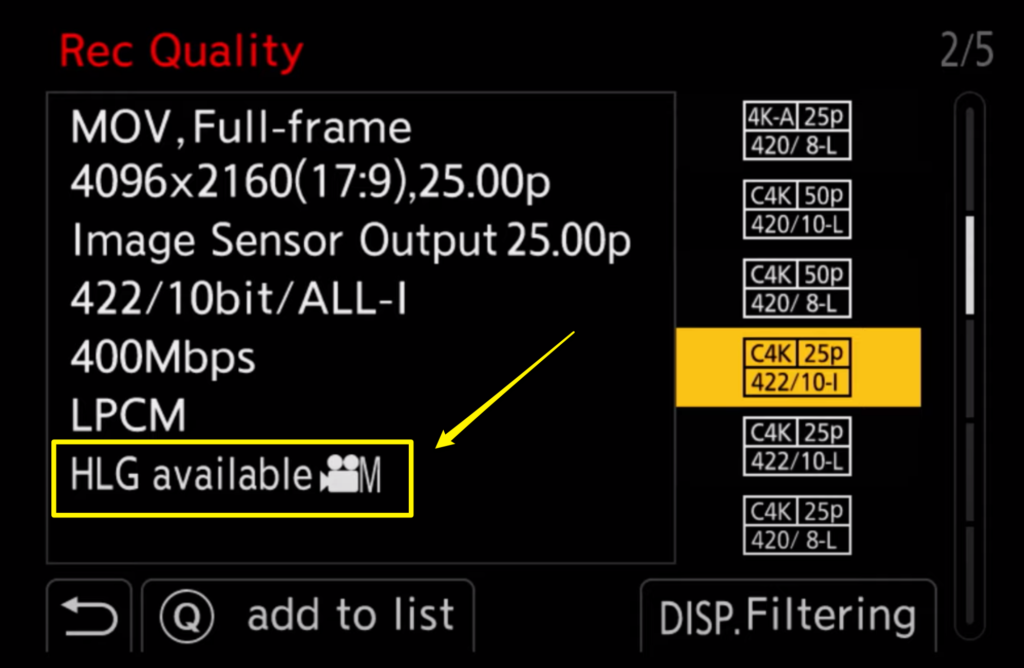
Under Rec Format select MOV
Under Rec Quality select 4K/8bit/150/60p (I know this doesn’t make sense, but follow along)
Under HDMI Rec Output select 4K/60p Bit Mode
NOW change the Photo Style to Hybrid Log Gamma
Important: For the GH5 to have access to 60p video, the camera must be in NTSC (59.94 frequency) mode. Weird, but that’s the way it is. Also keep in mind that with HLG the lowest ISO available is 400, and we can’t change Contrast, Luminance Level, or Highlight Shadow.
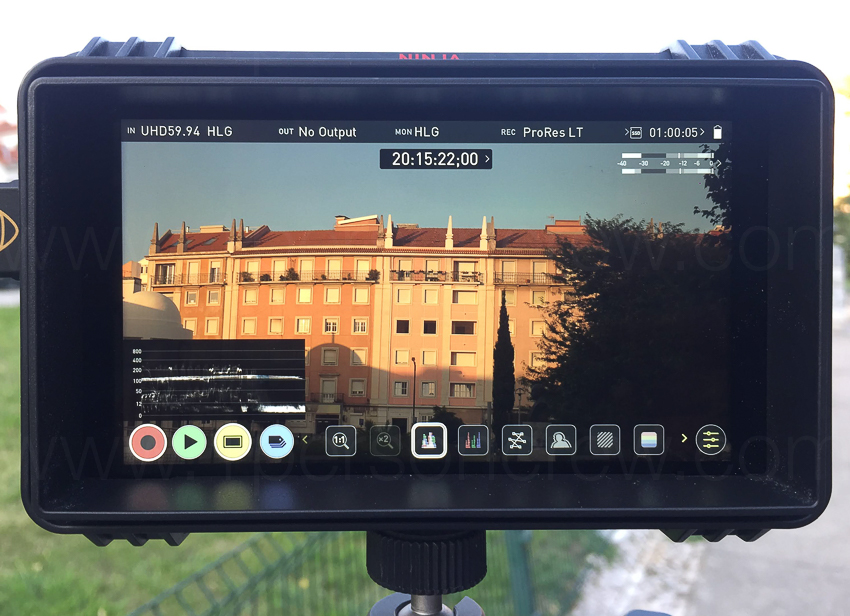
Setting up the Monitor/Recorder
To retain all of the 10Bit data, we need to set the Atomos Ninja V to record in one of the following codec formats:
Apple ProRes HQ
Apple ProRes 422
Apple ProRes LT
Avid DNxHR HQX (4k)
Avid DNxHD 220x (HD)
According to Atomos “another important item is a high quality HDMI cable that is capable of handling the bandwidth of a 10Bit 4K60p signal. These cables are generally labeled “2.0a” (though not every 2.0a cable is made well enough to work properly).
Here’s more info directly from Atomos regarding the Panasonic GH5.
Takeaway: Even if your camera supports HLG, you might need an external monitor recorder. The setup process is far from quick or intuitive, and LOTS of testing is required before using HLG on a real shoot.
The 1PersonCrew approach is to save the cameras settings we use more often as Custom Menu so we are up and running with a click of a button.
For example, on the Panasonic GH5 I have set the C1 menu for Standard 4k 24p 5600k shooting, the C2 Menu for slow-motion, and now the C3 Menu for HLG.
Not all resolutions and codecs support HLG, so check your camera’s manual.
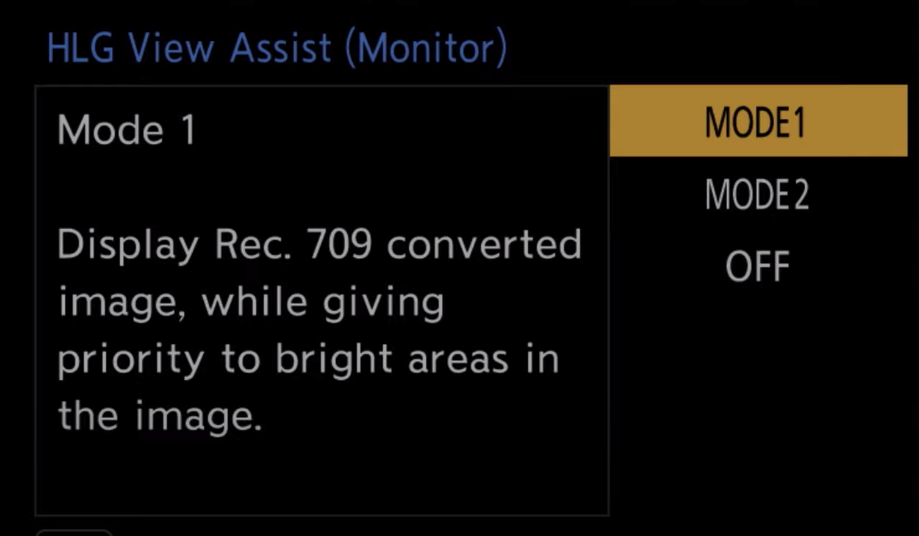
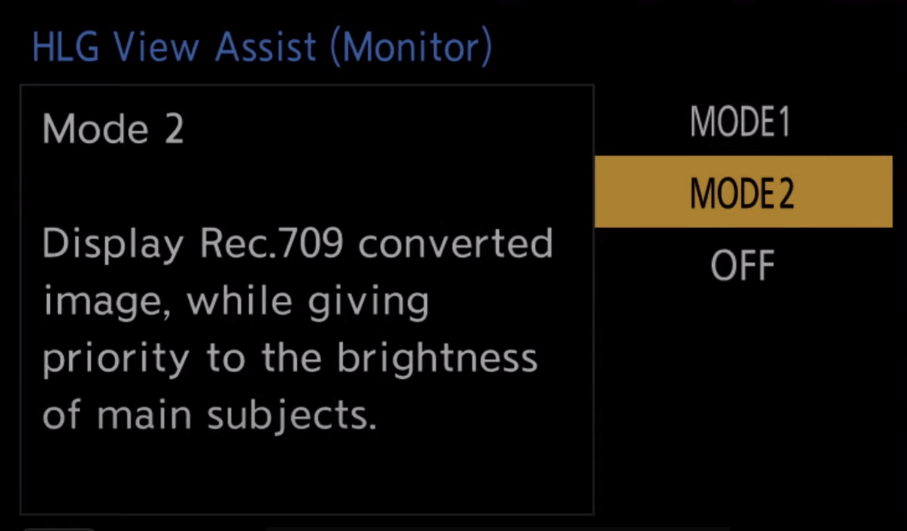
On the Panasonic GH5 the HLG View assist options can not be more confusing…
What’s next?
I’ve been doing lots of different tests, under different lighting conditions and using different settings both on the camera and the Ninja V.
I might write a second post on this once I’m happy with the results and if/when I’m able to come up with a simple and consistent shortcut for the settings.
I created three lists to share my favorite tools; one for the travel filmmaker who’s priority is size and weight. The second gear list is for those who are getting started or are looking to add new/better tools. And the third list is for more experienced filmmakers who want to take their productions to the next level.
Here’s the third gear configuration I’d suggest:
The Cinematic Look
This list is for people who already own the essential tools, but want to increase the quality of their video productions. A cinema camera and lenses, additional lighting tools, and better audio gear are included.
The “Cinematic Look” is what I’ve used for high-end corporate gigs, music videos, and even short films. Not all the items on the list are supposed to be used simultaneously. For example: I’d use the NanLite MixPanel 150 and a PavoTube Kit on most situations, unless shipping gear is required. In that case I’d use the Fiilex kit.
The same goes for lenses. Under controlled and well-planned situations, I prefer to use the Rokinon Cine lenses, but depending on the story, subject and shooting schedule a fast zoom lens might be a better option.
The gear lists are not paid or sponsored by anyone. They reflect my own independent opinion, and the companies and products I use and trust. Some links might be affiliates, which means I may get a few pennies if you decide to purchase something. Thanks in advance for your support!
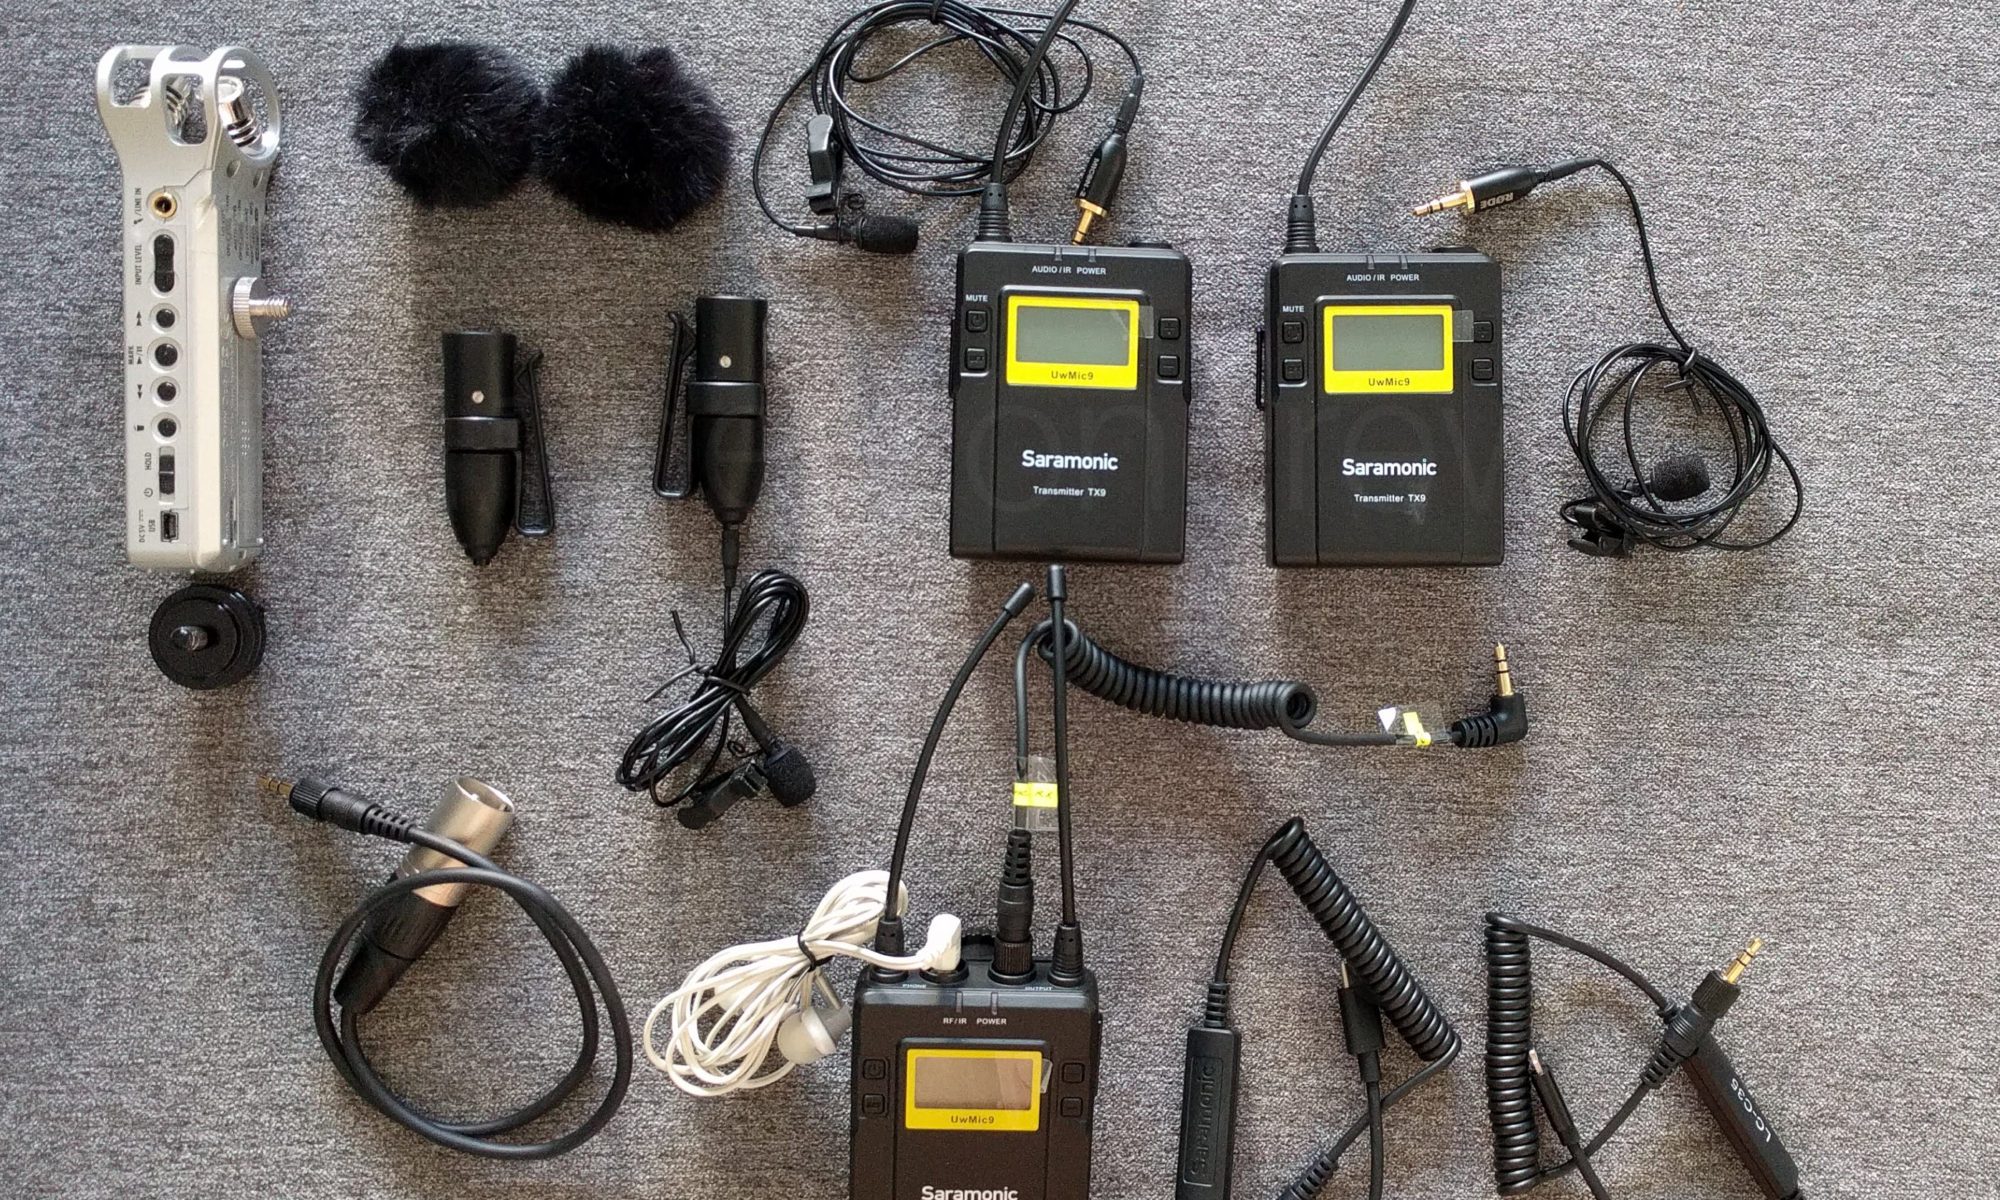
This is the third audio test I share on 1PersonCrew.com
On the first test I tested 12 different mic configurations and the second test was about 3 different wireless systems for filmmakers. Since then I’ve received lot of different ideas and suggestions, mostly positive, that I’m adding to today’s test.
Mic 2 and Mic 4 are connected to an H4n Pro field recorder (newest model) via XLR Cables. Mic 2 is on the Left Channel and Mic 4 is on the Right Channel.
DISCLAIMER This article is not paid or sponsored by anyone. It reflects my own independent opinion. I only recommend companies and products that I trust. Some links might be affiliates, which means I may get a few pennies if you decide to purchase something. Thanks in advance for your support!
Last week I received my first official complaint about 1 Person Crew. It was a very polite email from Michael G. saying “I truly appreciate the time you take to share your thoughts, but the last few posts have been about hardware. At some point, would you mind sharing some of the applications you use as well?”
Michael is totally right. I stand corrected and thanks for the feedback!
So, today’s post is about some of the software applications, plugins and smartphone apps that help me work more efficiently. The list isn’t organized in any particular order. I simply looked at my phone and computer and added the apps I use most often. I’ve added direct links for your convenience.
DaVinci Resolve – The free video editing software I’d recommend for anyone getting started.
I created three lists to share my favorite tools; the first equipment guide is for the travel filmmaker who’s priority is size and weight. The second list is for those who are getting started or are looking to add new/better tools. And the third list is for more experienced filmmakers who want to take their productions to the next level.
Here’s my second suggested gear setup:
Up and Running
This list includes the most essential items for people getting started, or who are currently shooting video but want to upgrade some gear. Lenses, mics and lights are fairly typical items. Size and weight are important, but not super critical.
I’d recommend this setup for anyone involved in run and gun scenarios like vlogs, education and training, weddings, red carpet premieres, product launches, sporting events and documentaries.
A typical example for this setup is corporate gigs where I have the luxury to setup one day, shoot multiple interviews for a couple of days, and then take my time packing everything carefully.
The gear lists are not paid or sponsored by anyone. They reflect my own independent opinion, and the companies and products I use and trust. Some links might be affiliates, which means I may get a few pennies if you decide to purchase something. Thanks in advance for your support!
Today’s tip is about how to create sequence so you can edit multiple cameras in real time, with the click of your mouse (or using the number keys on your keyboard).
Like many people shooting documentaries and interviews, I often shoot with two (or even three) cameras, and record audio separately.
Syncing the footage with the clean audio source in Adobe Premiere Pro or DaVinci Resolve is relatively easy, but not always accurate. That is why for many years I’ve been using a plugin called PluralEyes.
Live editing is a great way to cut VERY quickly, but it involves a few “hidden” steps:
If you are serious about the craft of video editing, this new online course by Oscar-winning editor Tom Cross (Whiplash, La La Land and First Man) is pure gold. Highly recommended.
Do you find these tutorials and resources useful? Let me know!
Last week we talked about the differences between Video Codecs, and more specifically about the advantages and disadvantages between ALL-I and IPB.
DISCLAIMER This article is not paid or sponsored by anyone. It reflects my own independent opinion. I only recommend companies and products that I trust. Some links might be affiliates, which means I may get a few pennies if you decide to purchase something. Thanks in advance for your support!
Audio File Formats
Since last week’s post I’ve received several questions about audio formats. Instead of rewriting what has been already done well, I’ll direct you to an article by Izotope, which is in my humble opinion the provider of best audio plugins in the market.
The article covers the differences between wav, aiff, mp3, and m4a, which is pretty much all we need to know as filmmakers.
Audio Gear
Lots of folks have also been asking about “the most minimalist audio kit” I’d suggest.
Here it is: a wireless system, an audio field recorder, and extra mic that can doble as on-camera shotgun mic or boom mic, a couple of XLR cables (always bring backup cables), and enough rechargeable batteries to have a fully charged backup at all times. The H4n Pro is specially power hungry, so I’d strongly suggest getting the kit with the AC adapter.
I added one more item that is nice to have, but nor essential; the Rycote Undercovers, which allow you to “stick” a lavalier mic to a subject over or under their clothes. Much more useful than you would think.